We got married in Spring 2015 and got our first little apartment then. It was cute! It was cheap, and the neighbors were not great but still, those first six months of marriage were filled with sweet memories. We then moved nearly every six months after that into small apartments each time, and I enjoyed making every little space our home as best I could.
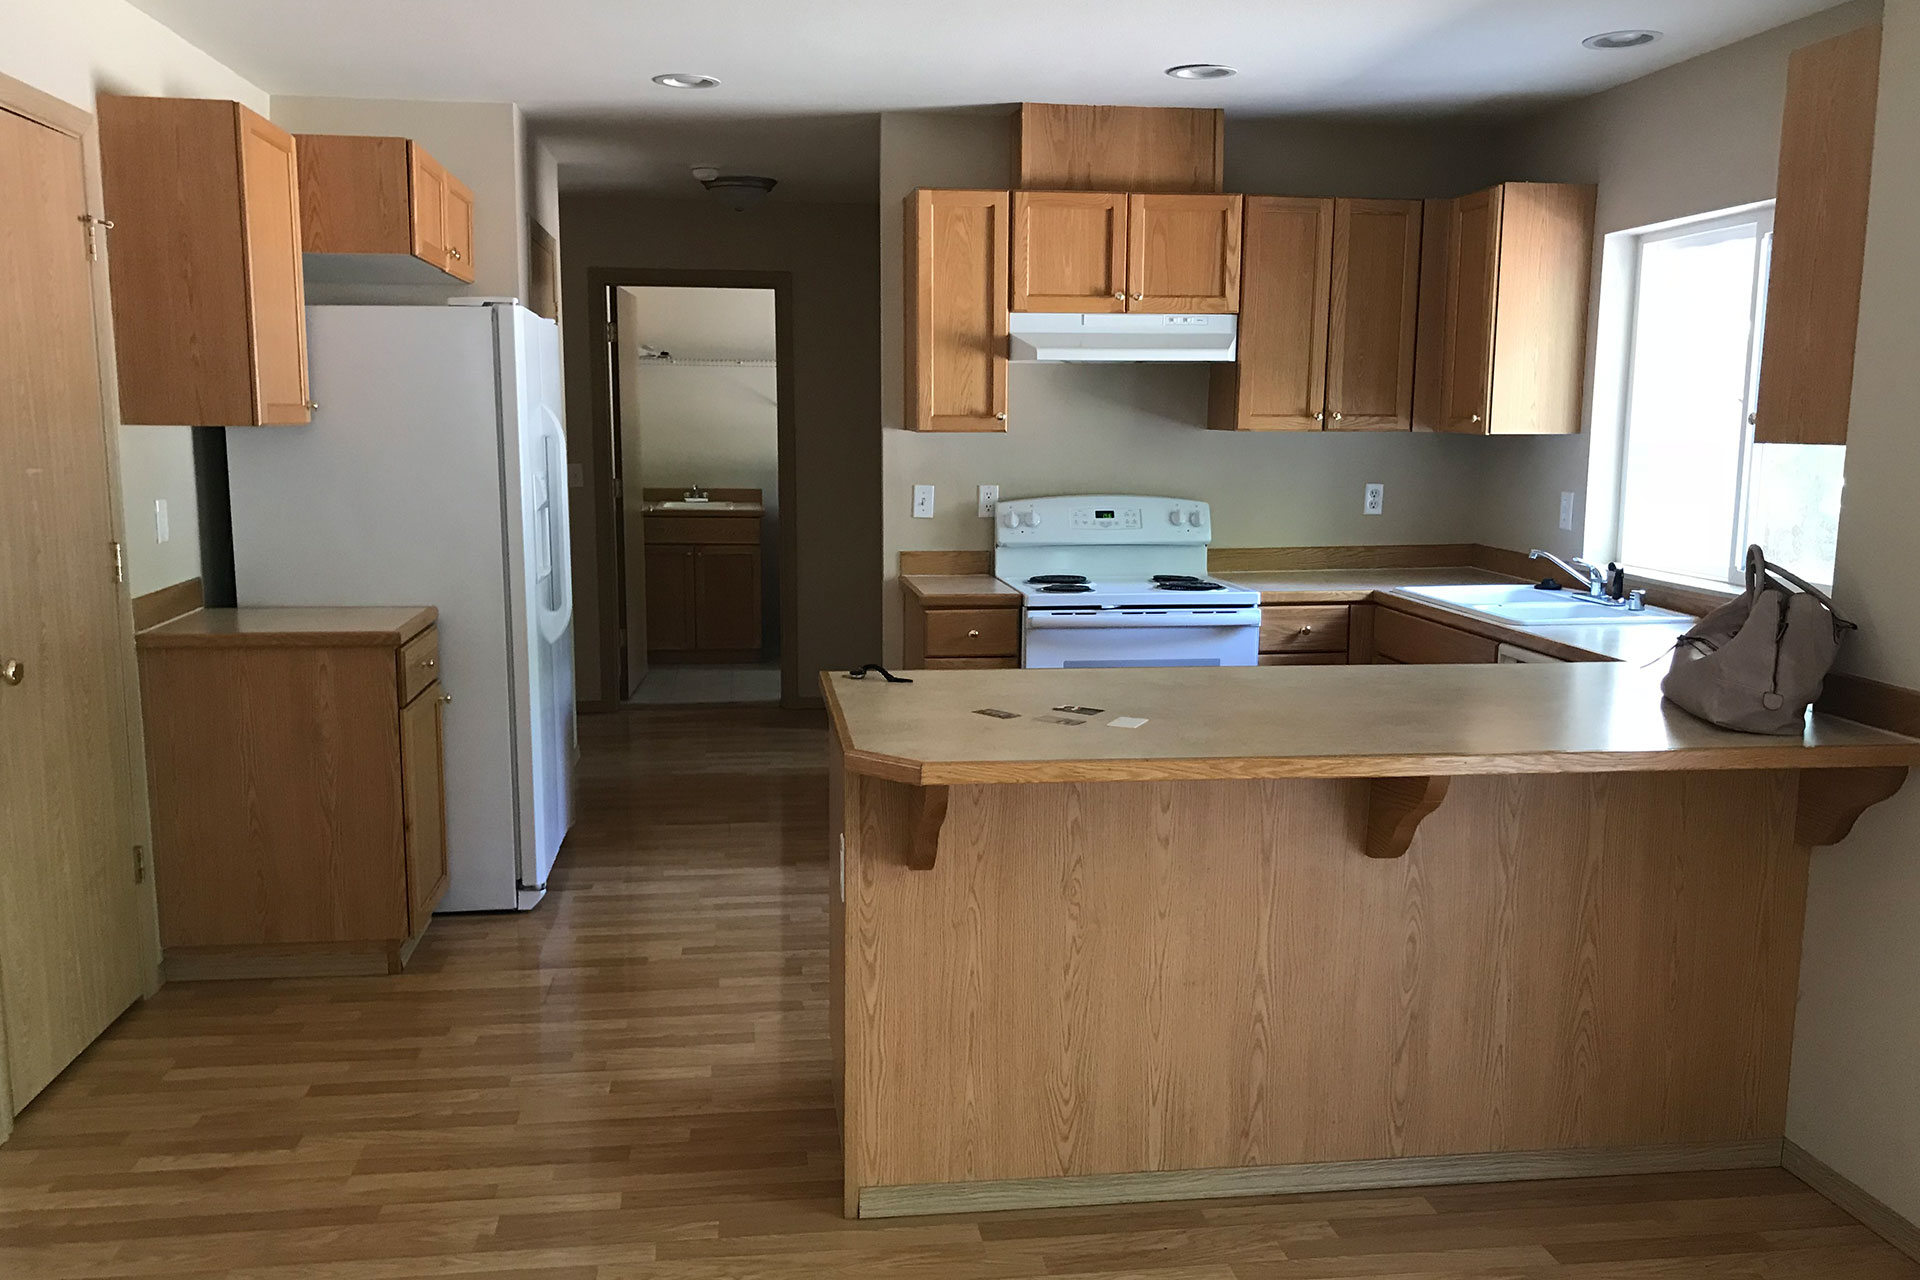
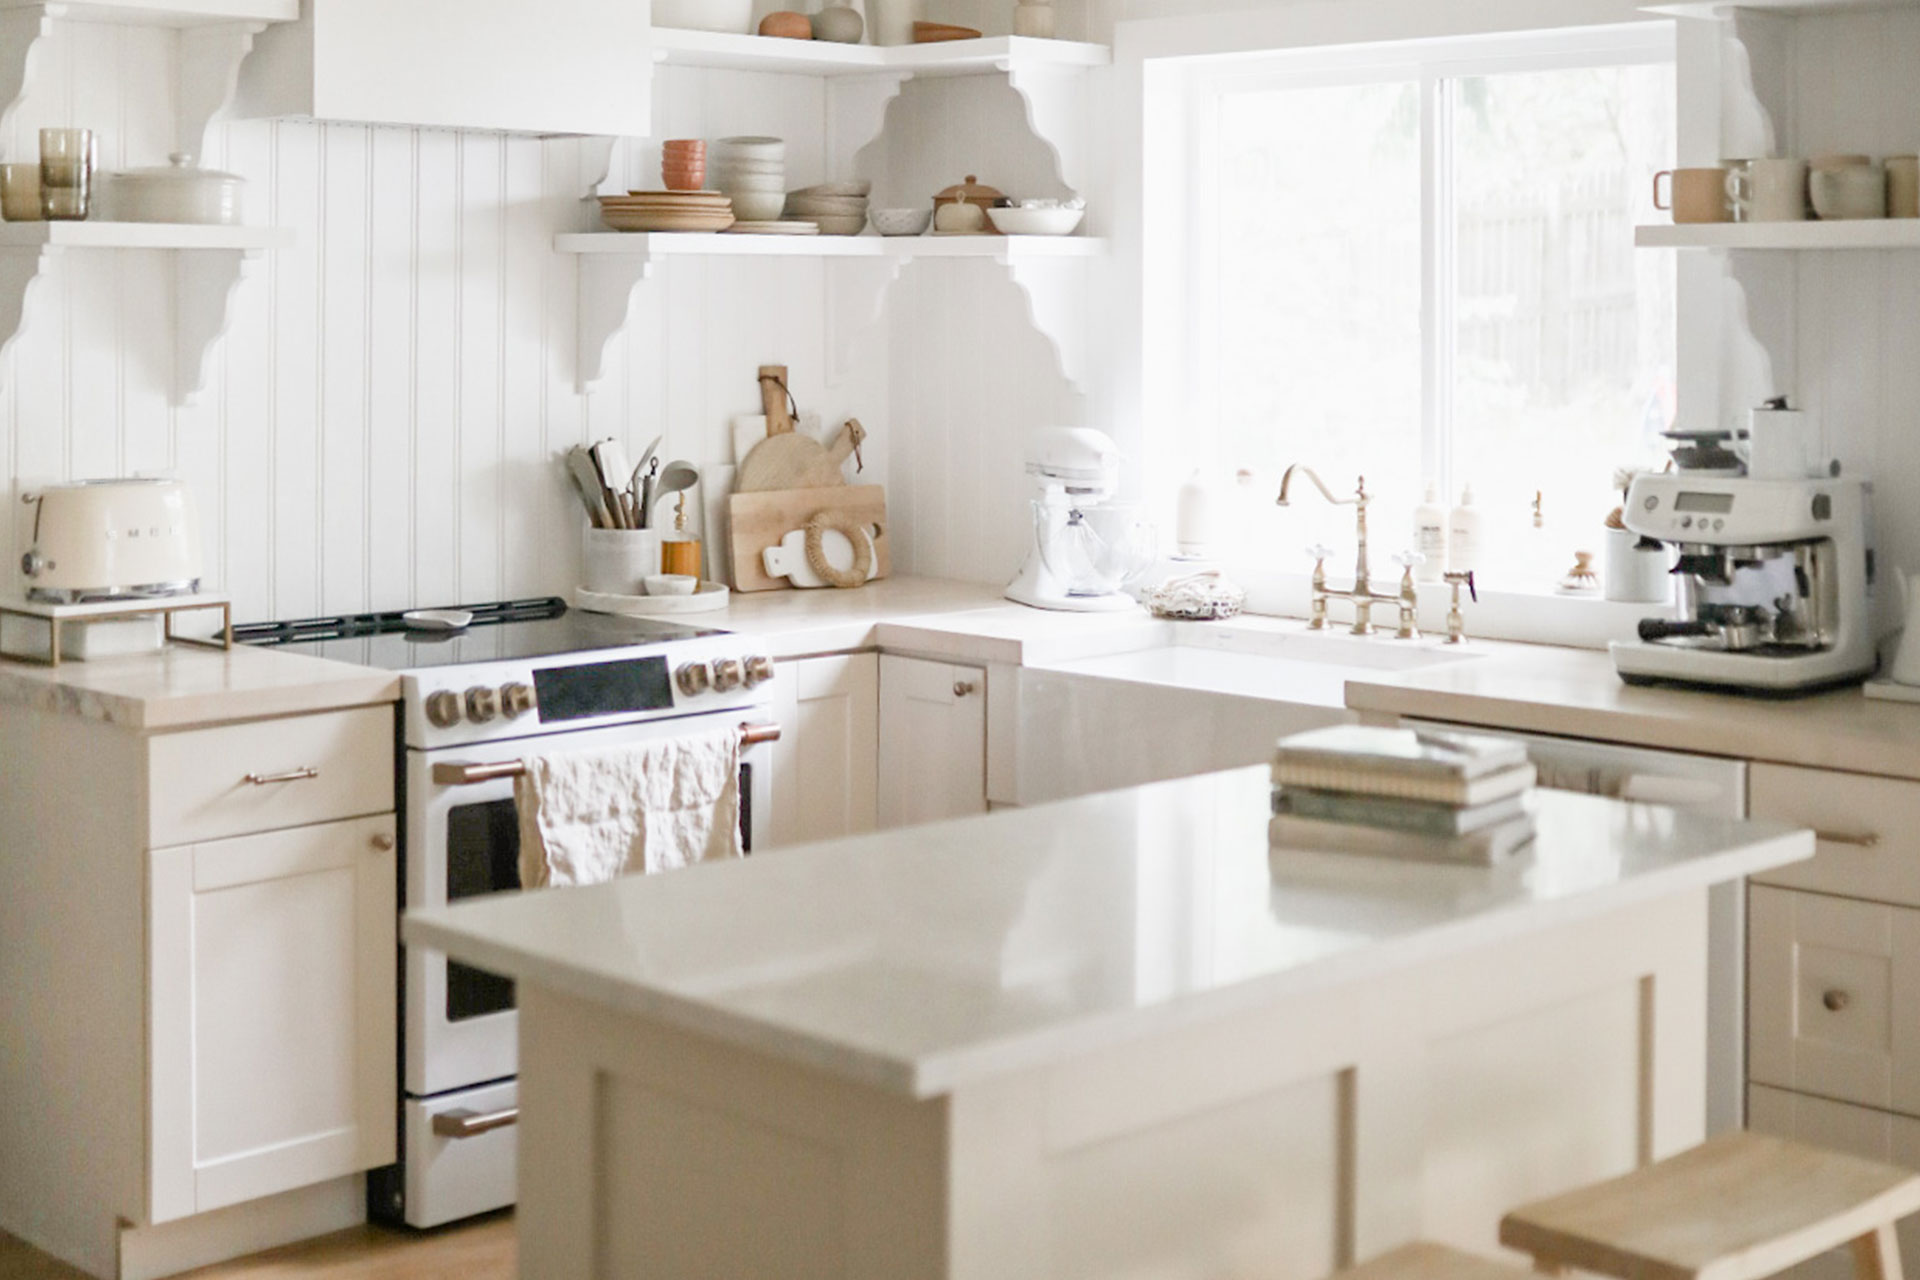
We purchased our home in Autumn 2018 and knew it would be a cosmetic fixer upper for us, but never really knew how long we’d be here so honestly didn’t plan out any big renovations like this one. It was under our budget, so we gave ourselves wiggle room for some DIY changes from the get-go but a house we could live in, even if we didn’t love the initial style. Our home is a 2006 builder grade home… so not our “dream” house by any means, but it’s our first/starter home, and we saw the potential it had to create the character it lacked. We’ve faced challenges, we’ve run into issues, we have gone over allotted budgets, we’ve made mistakes, we’ve had some setbacks, but this kitchen has been such an amazing win for us.
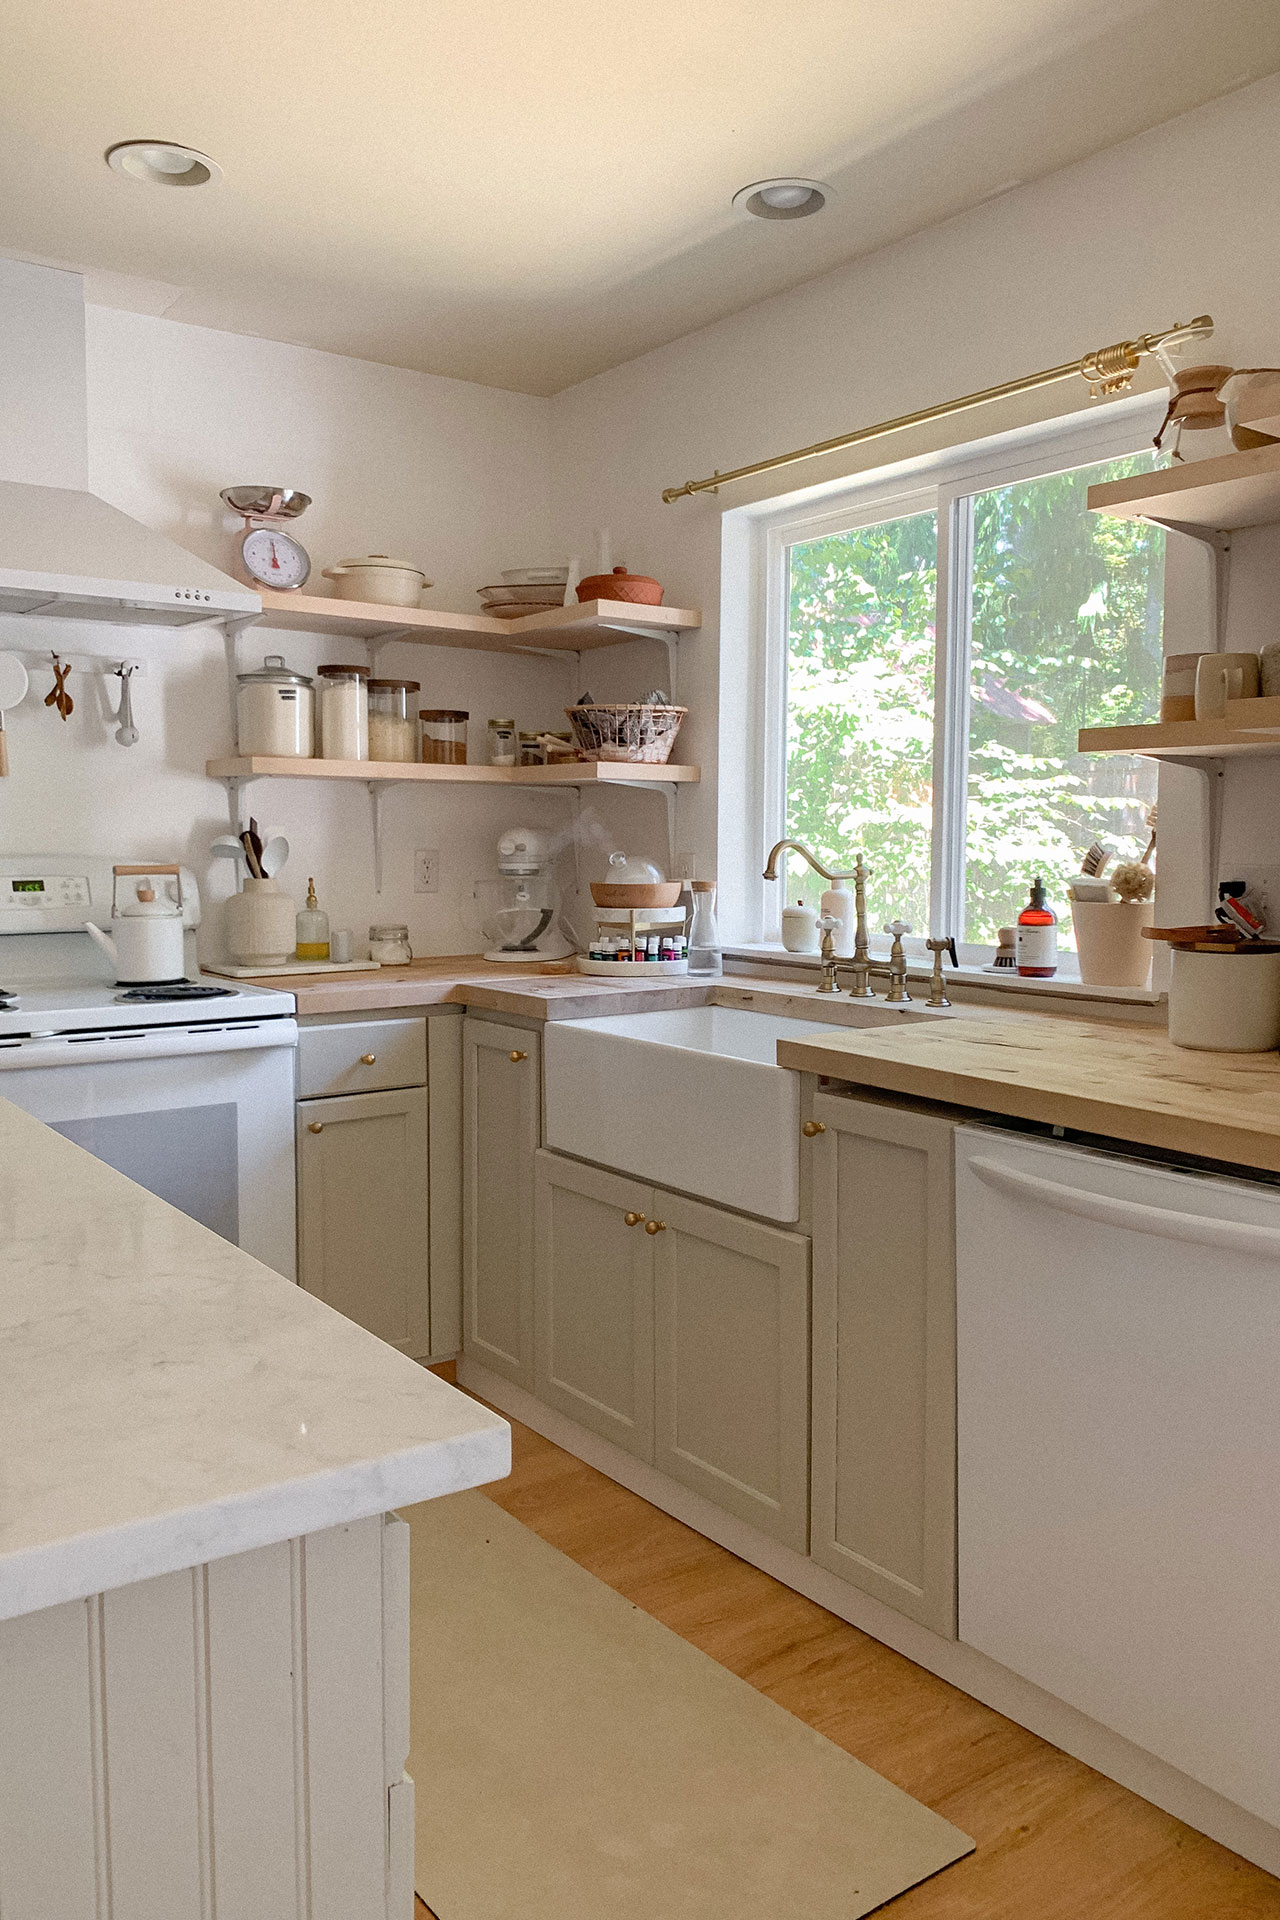
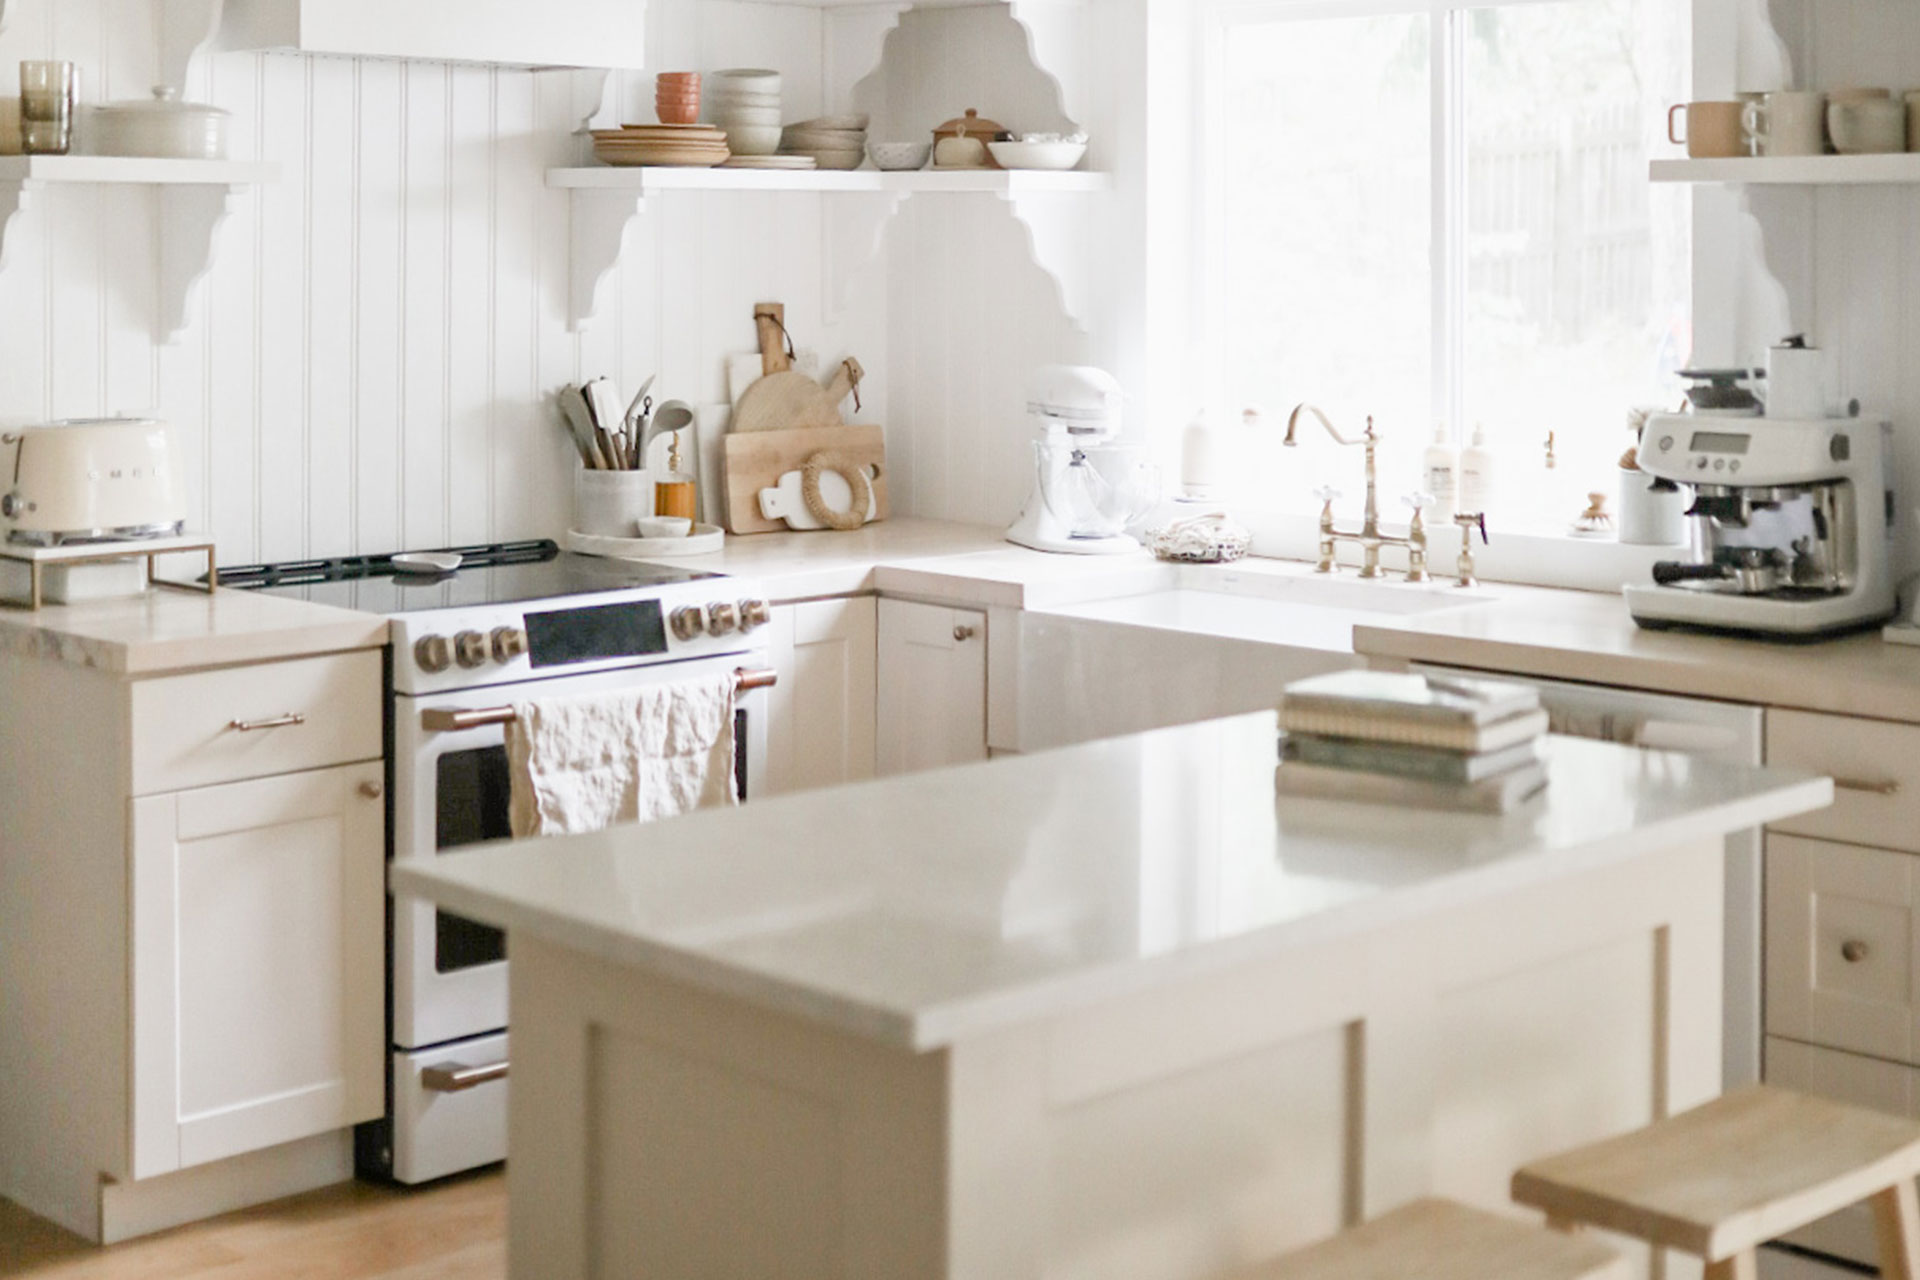
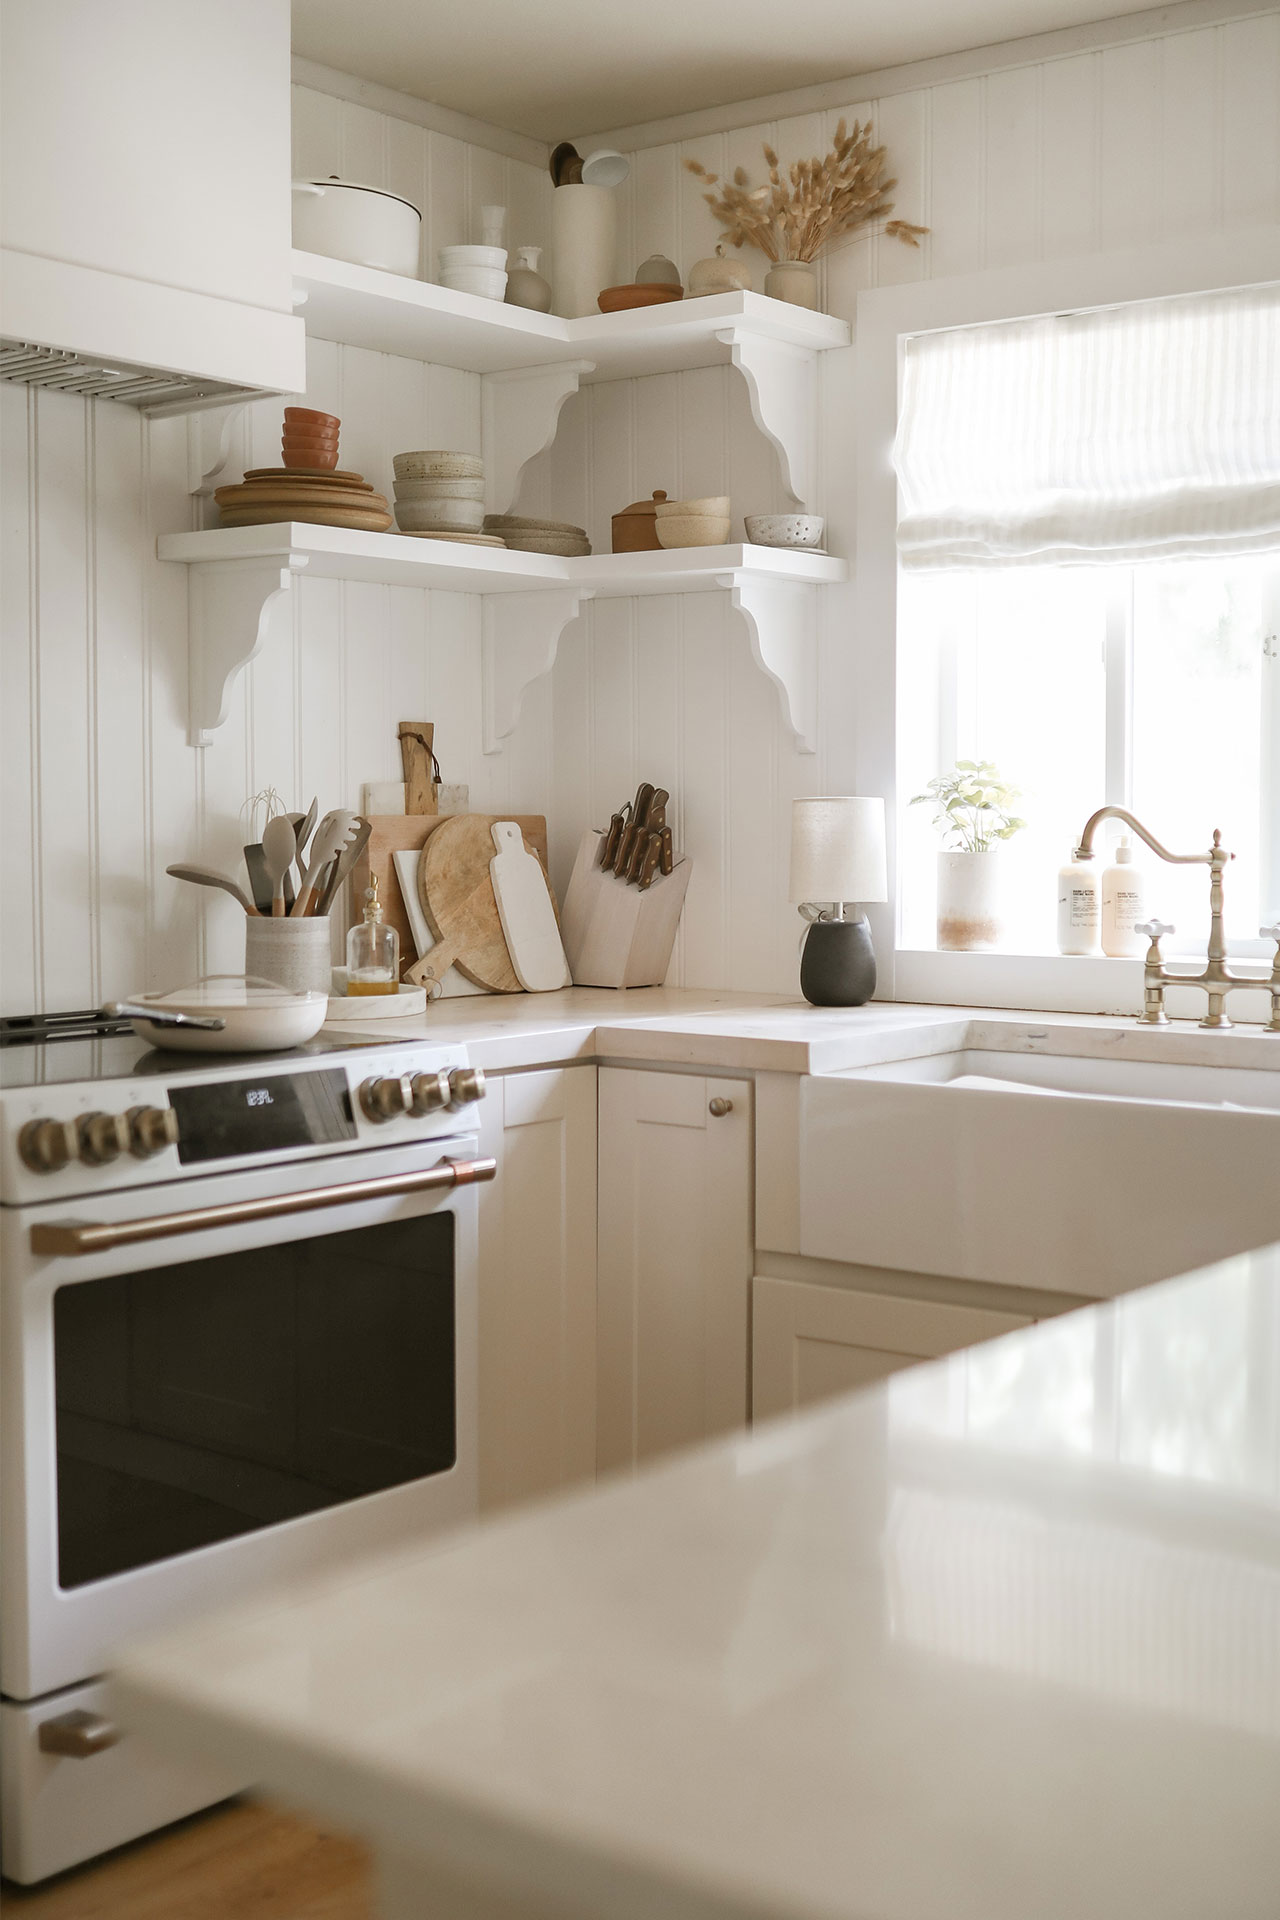
We made initial changes immediately after moving in. We painted all the walls ultra-pure white, then painted the cabinets with a $12 gallon of clearance paint from Target. We tore down the upper cabinets, and a month later added custom shelves my father-in-law built for us. We took apart the peninsula to give more space to the dining area side, and made a smaller island from a couple of the peninsula cabinets. Eventually we added butcher block from Lowe’s to the counters. We didn’t go with custom. We grabbed what they had in store. A couple 4 ft. pieces, and an 8 ft. DJ cut them to size himself. He absolutely had no idea what he was doing but he did great! We used a closet door we’d already taken down for a temporary island countertop, and a few months later found the most perfect slab of quartz remnant on fb marketplace. When we took apart the peninsula to make the island and added our butcher block, we also rearranged some of the cabinets to make our Sinkology farmhouse sink centered with the window. Our kitchen has evolved slowly with us, and it’s amazing to see it unfold!
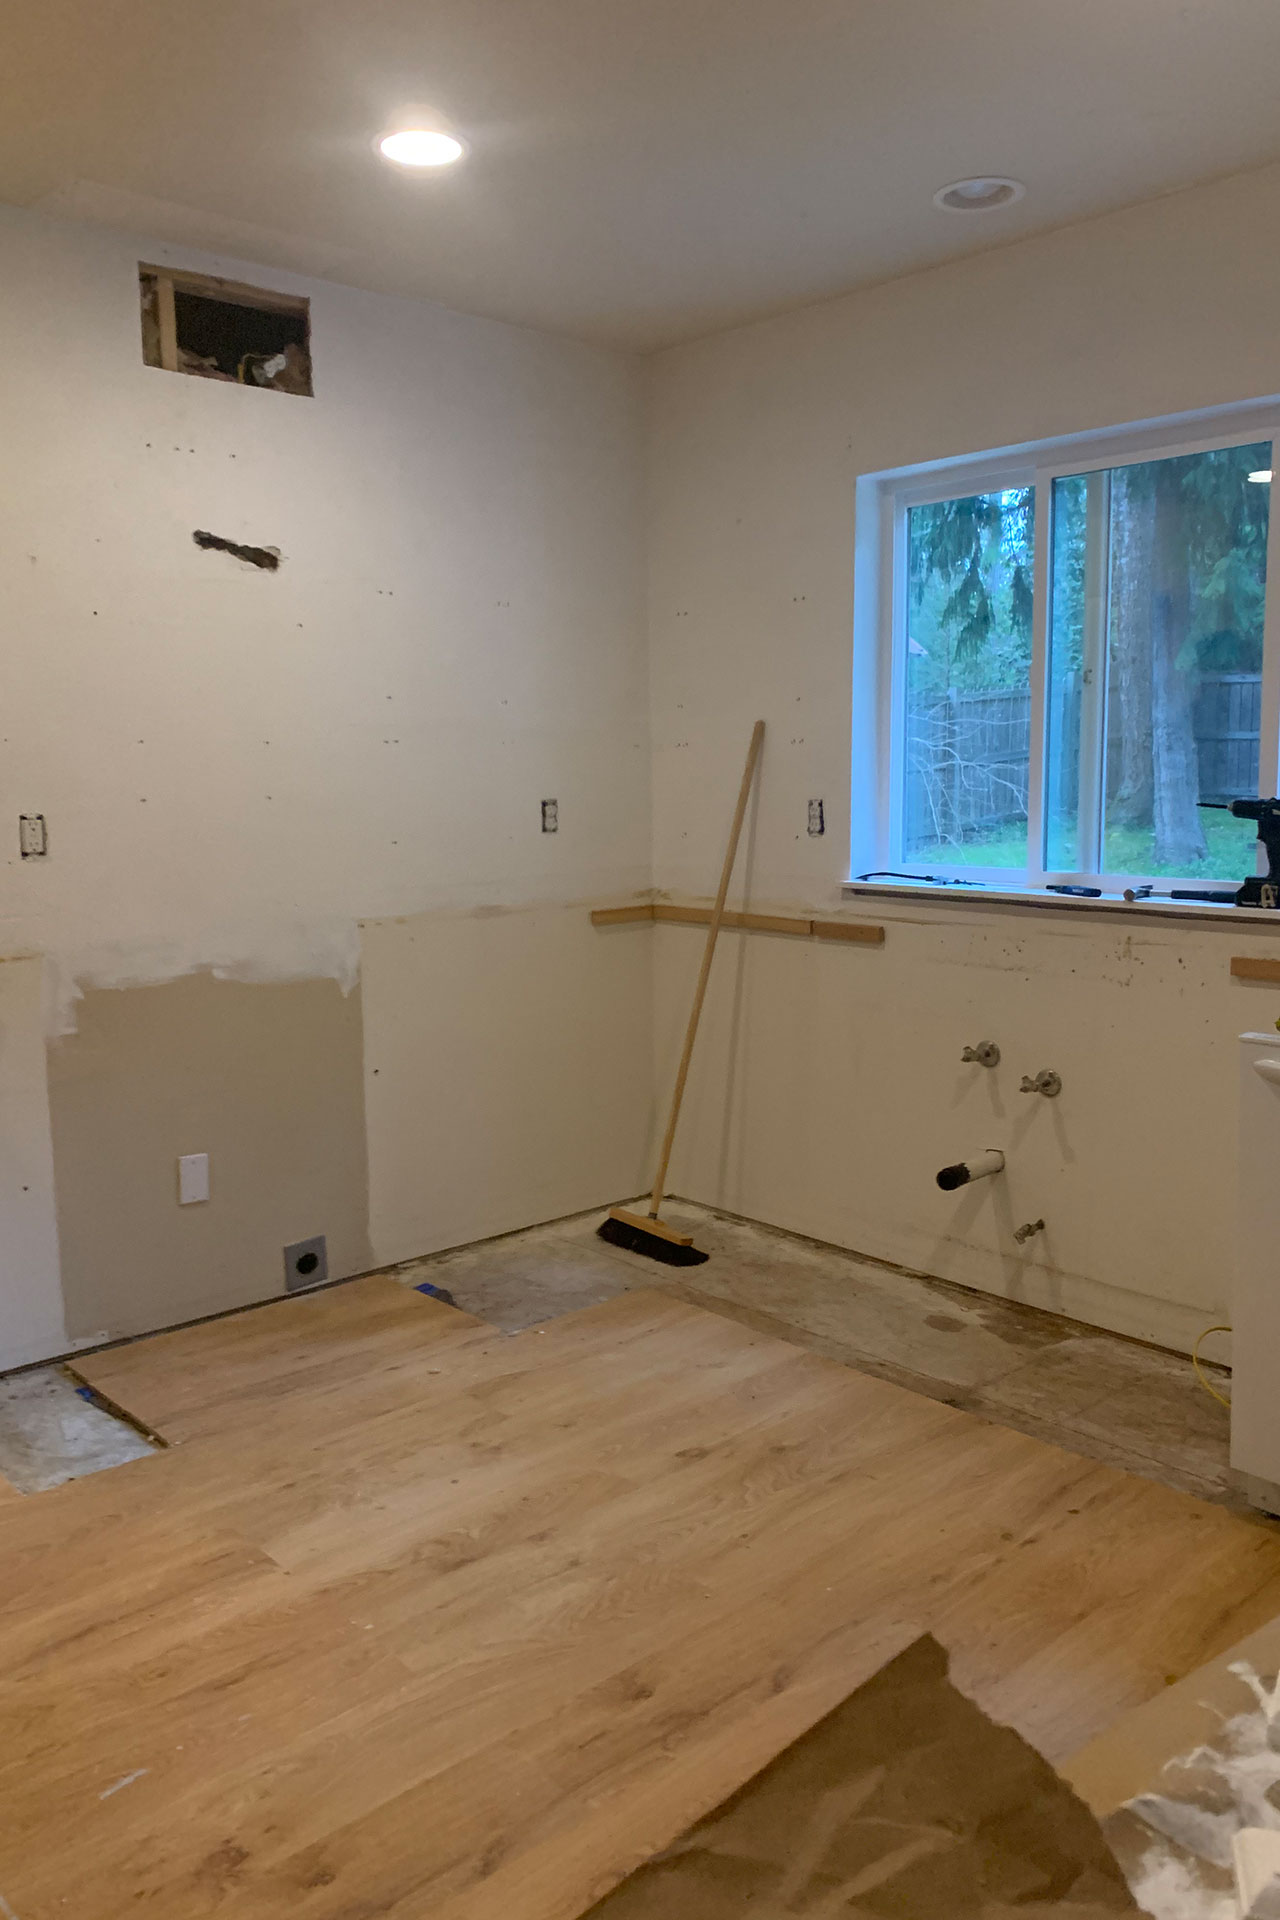
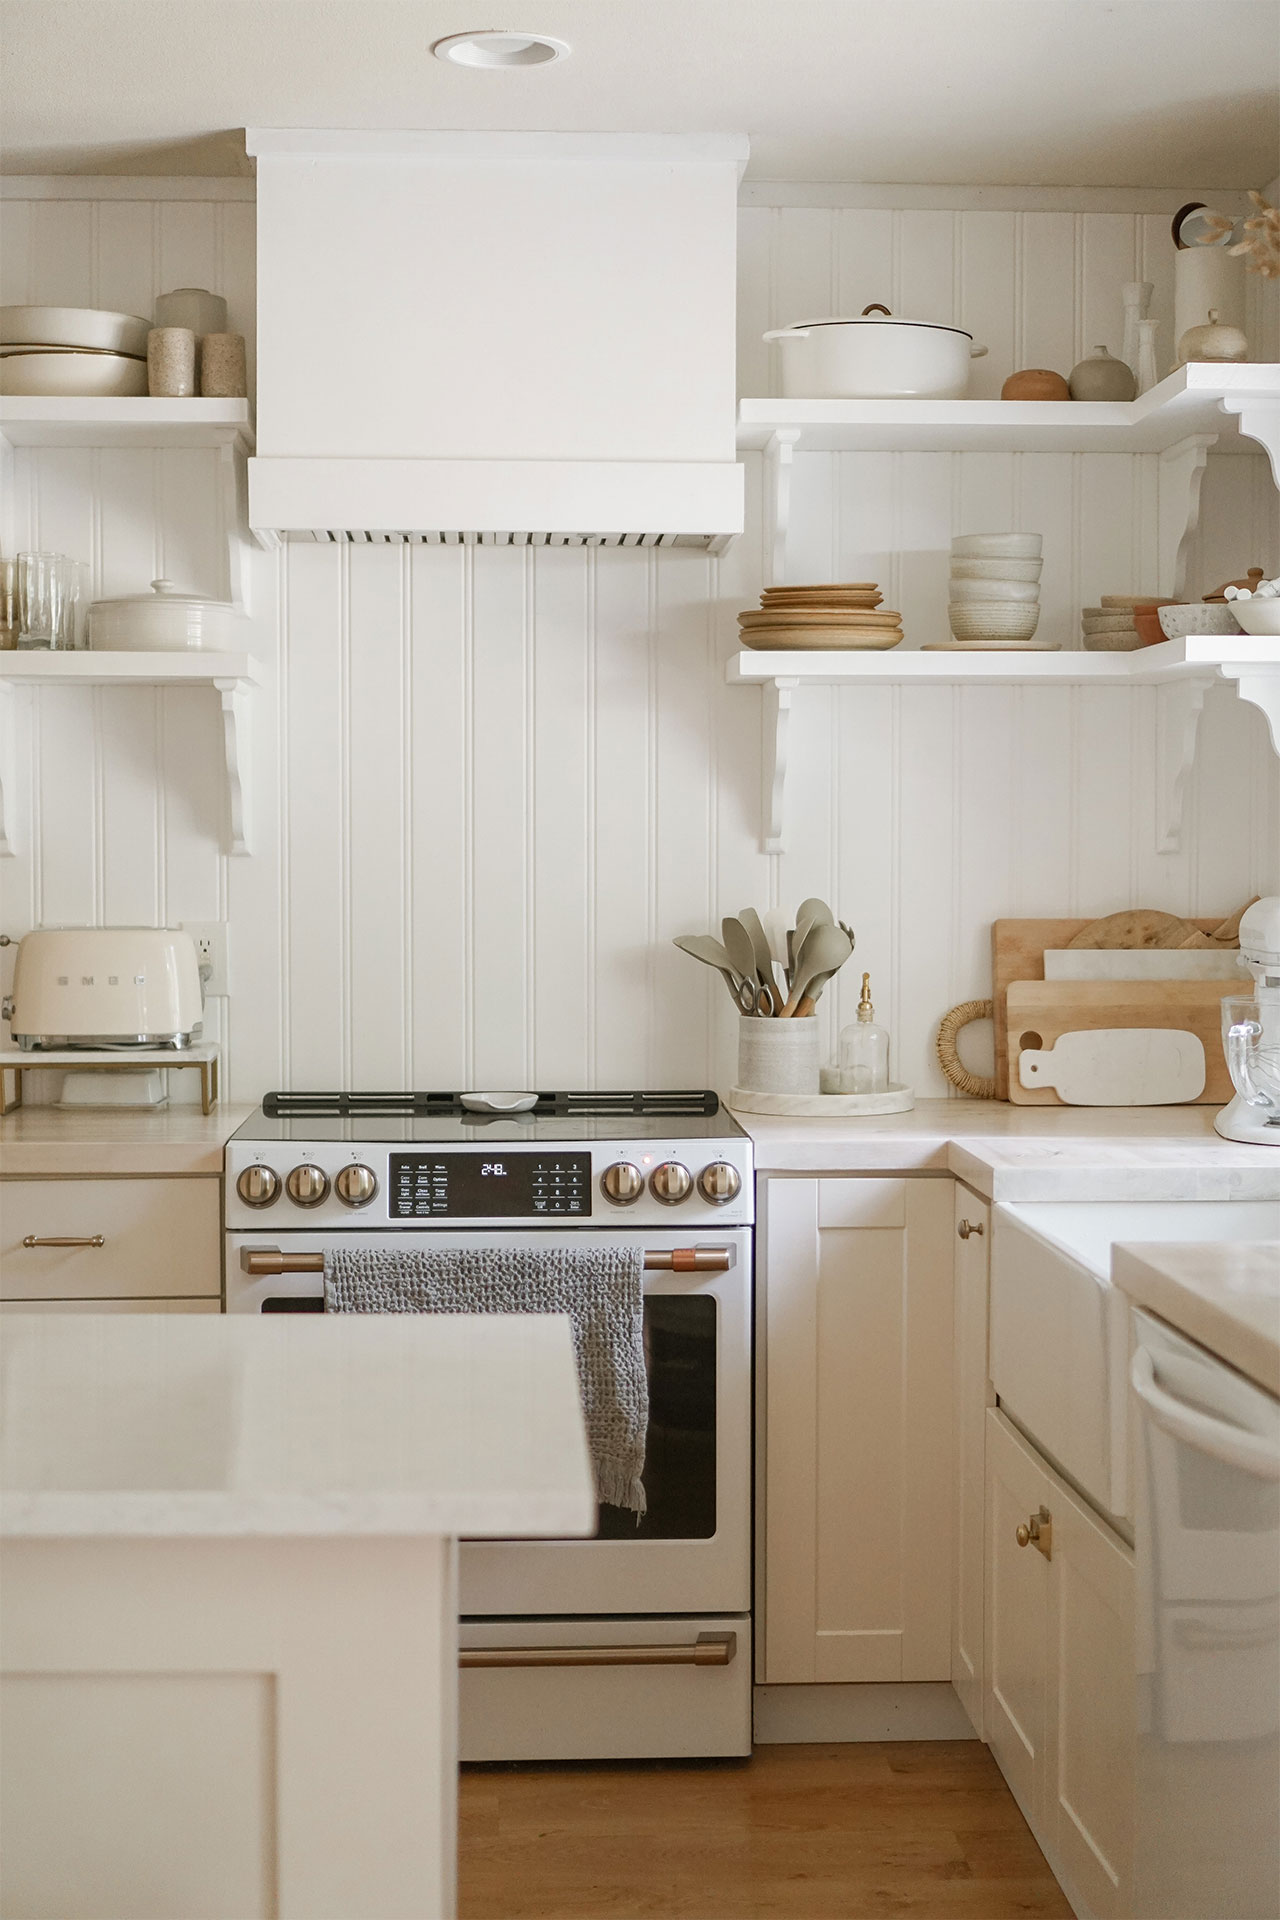
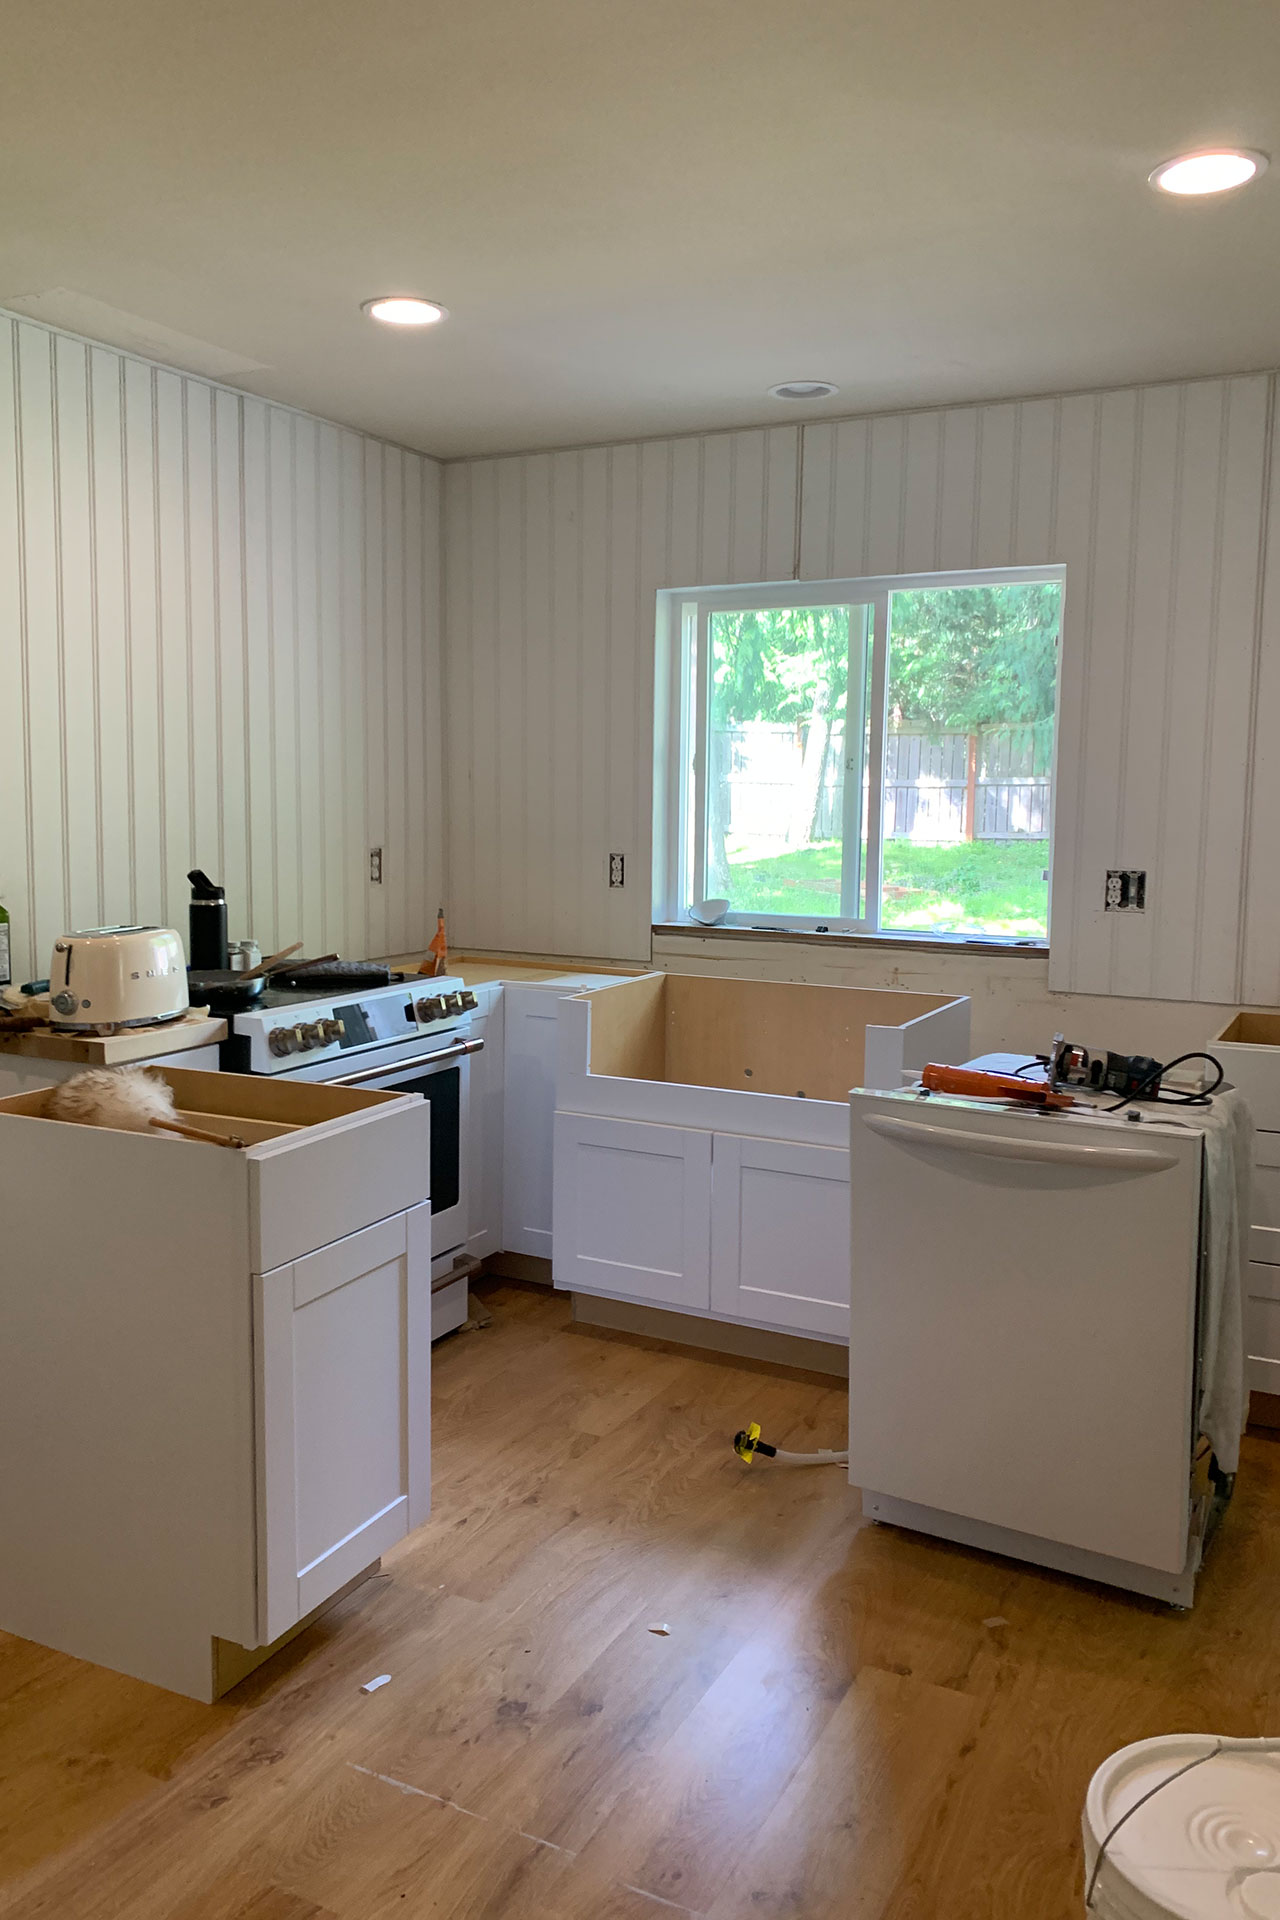
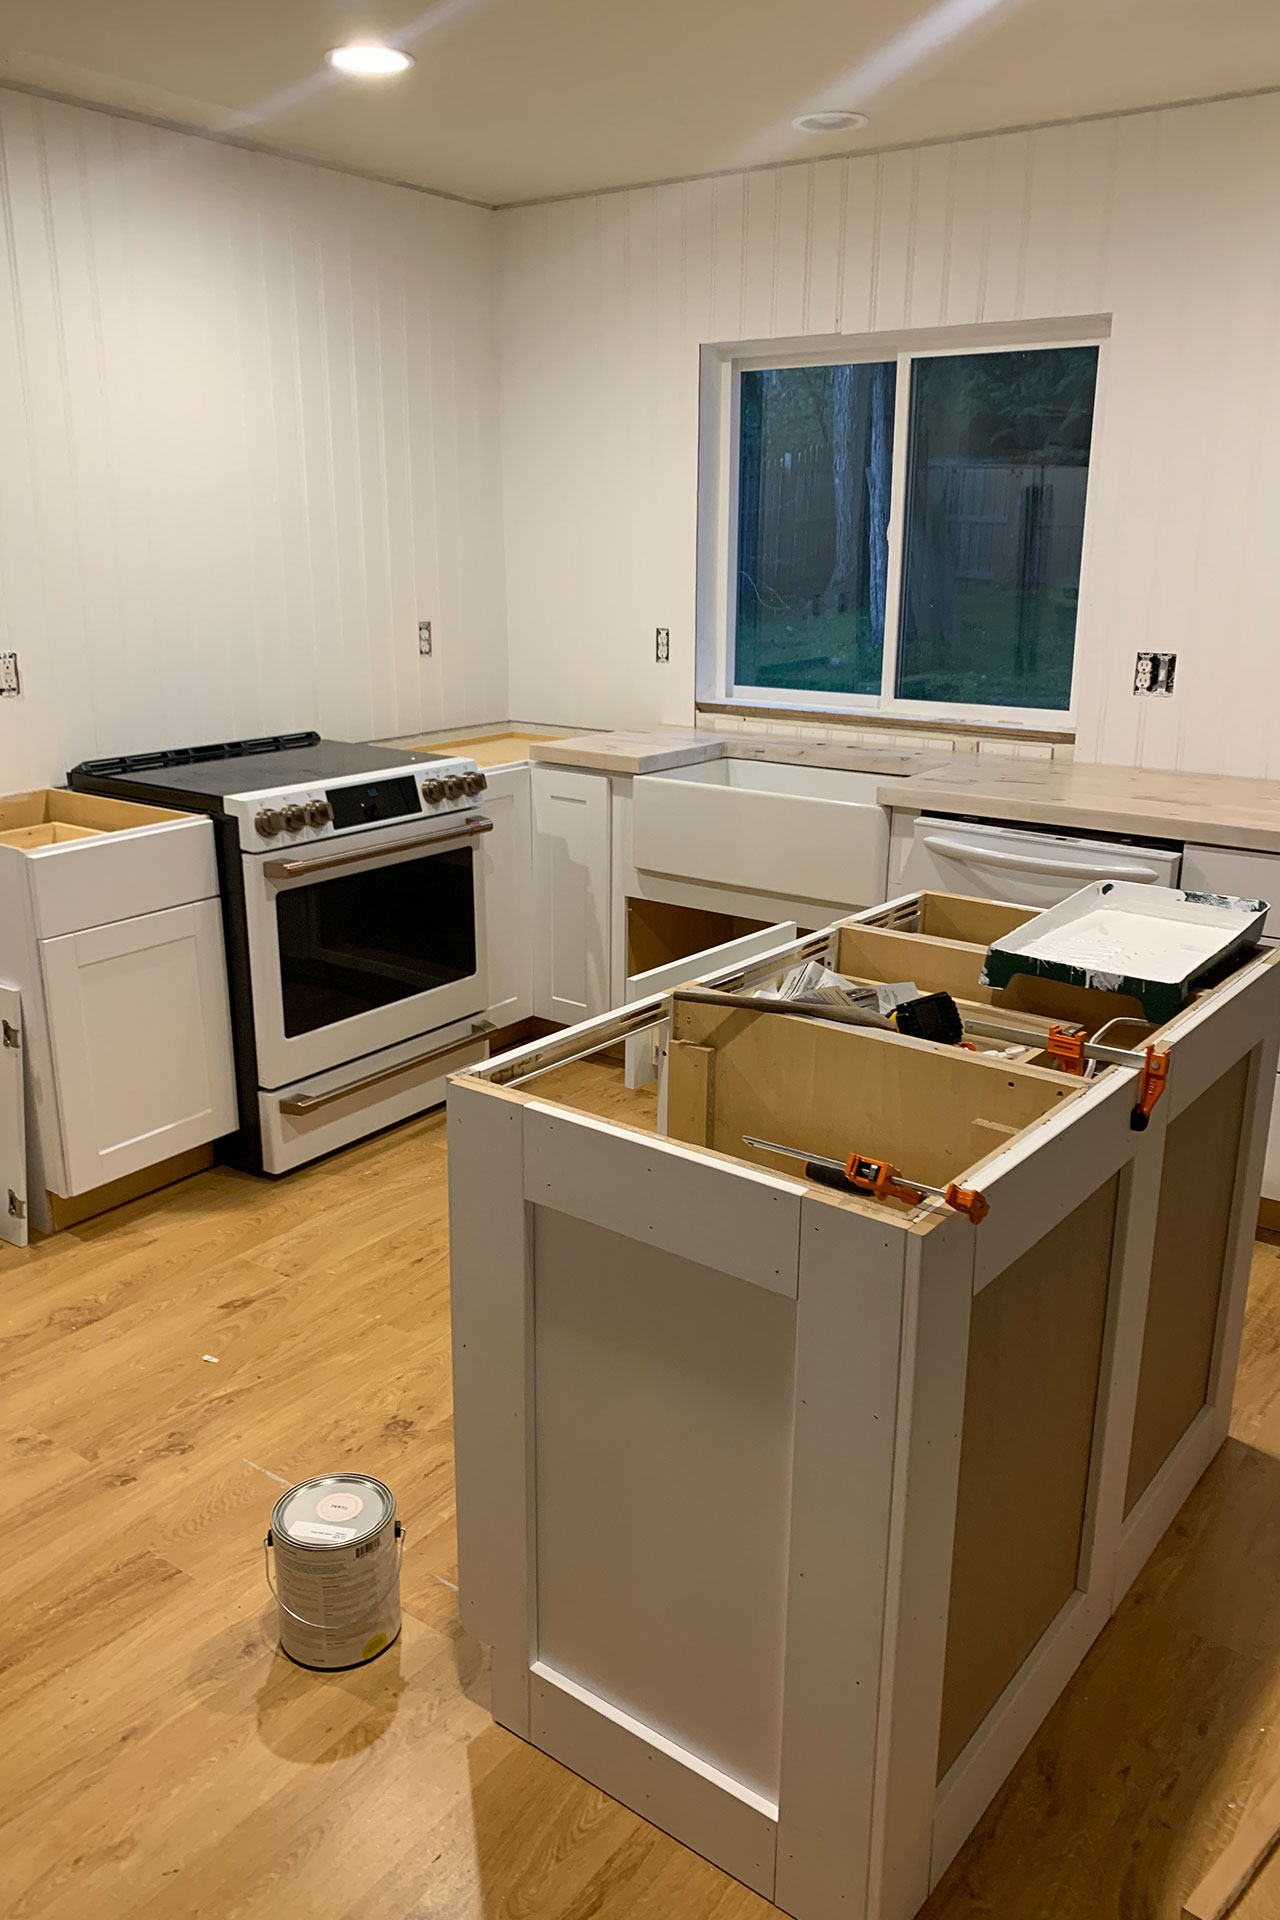
All the lower cabinets were warped, my shoddy paint job was entirely chipping off, drawers wouldn’t close, so a year later, after our initial low-budget updates, we decided it was time to make even more investment into our home. We bought all new cabinets (not custom, but still so great and fit into our budget) and kept the layout mostly the same. It’s functional and we didn’t want to have to deal with permits or additional expenses for structural changes. Six months later, we are still SO PLEASED with the results! Like truly, it’s better than we could’ve hoped without spending too much money. We invested where we felt was important to us, and reused where we could. We did it ourselves, with a couple priceless days of help from my father-in-law (bless him!!!). We are so proud of all we’ve done in this space. We had different ideas like adding custom inset shaker cabinets, quartz on all the countertops, moving the fridge to where the range is, etc., but we really wanted to try and make a huge impact without spending more than we actually needed to. And I keep saying it, but we’re just really happy with the outcome. So keep scrolling for more details!
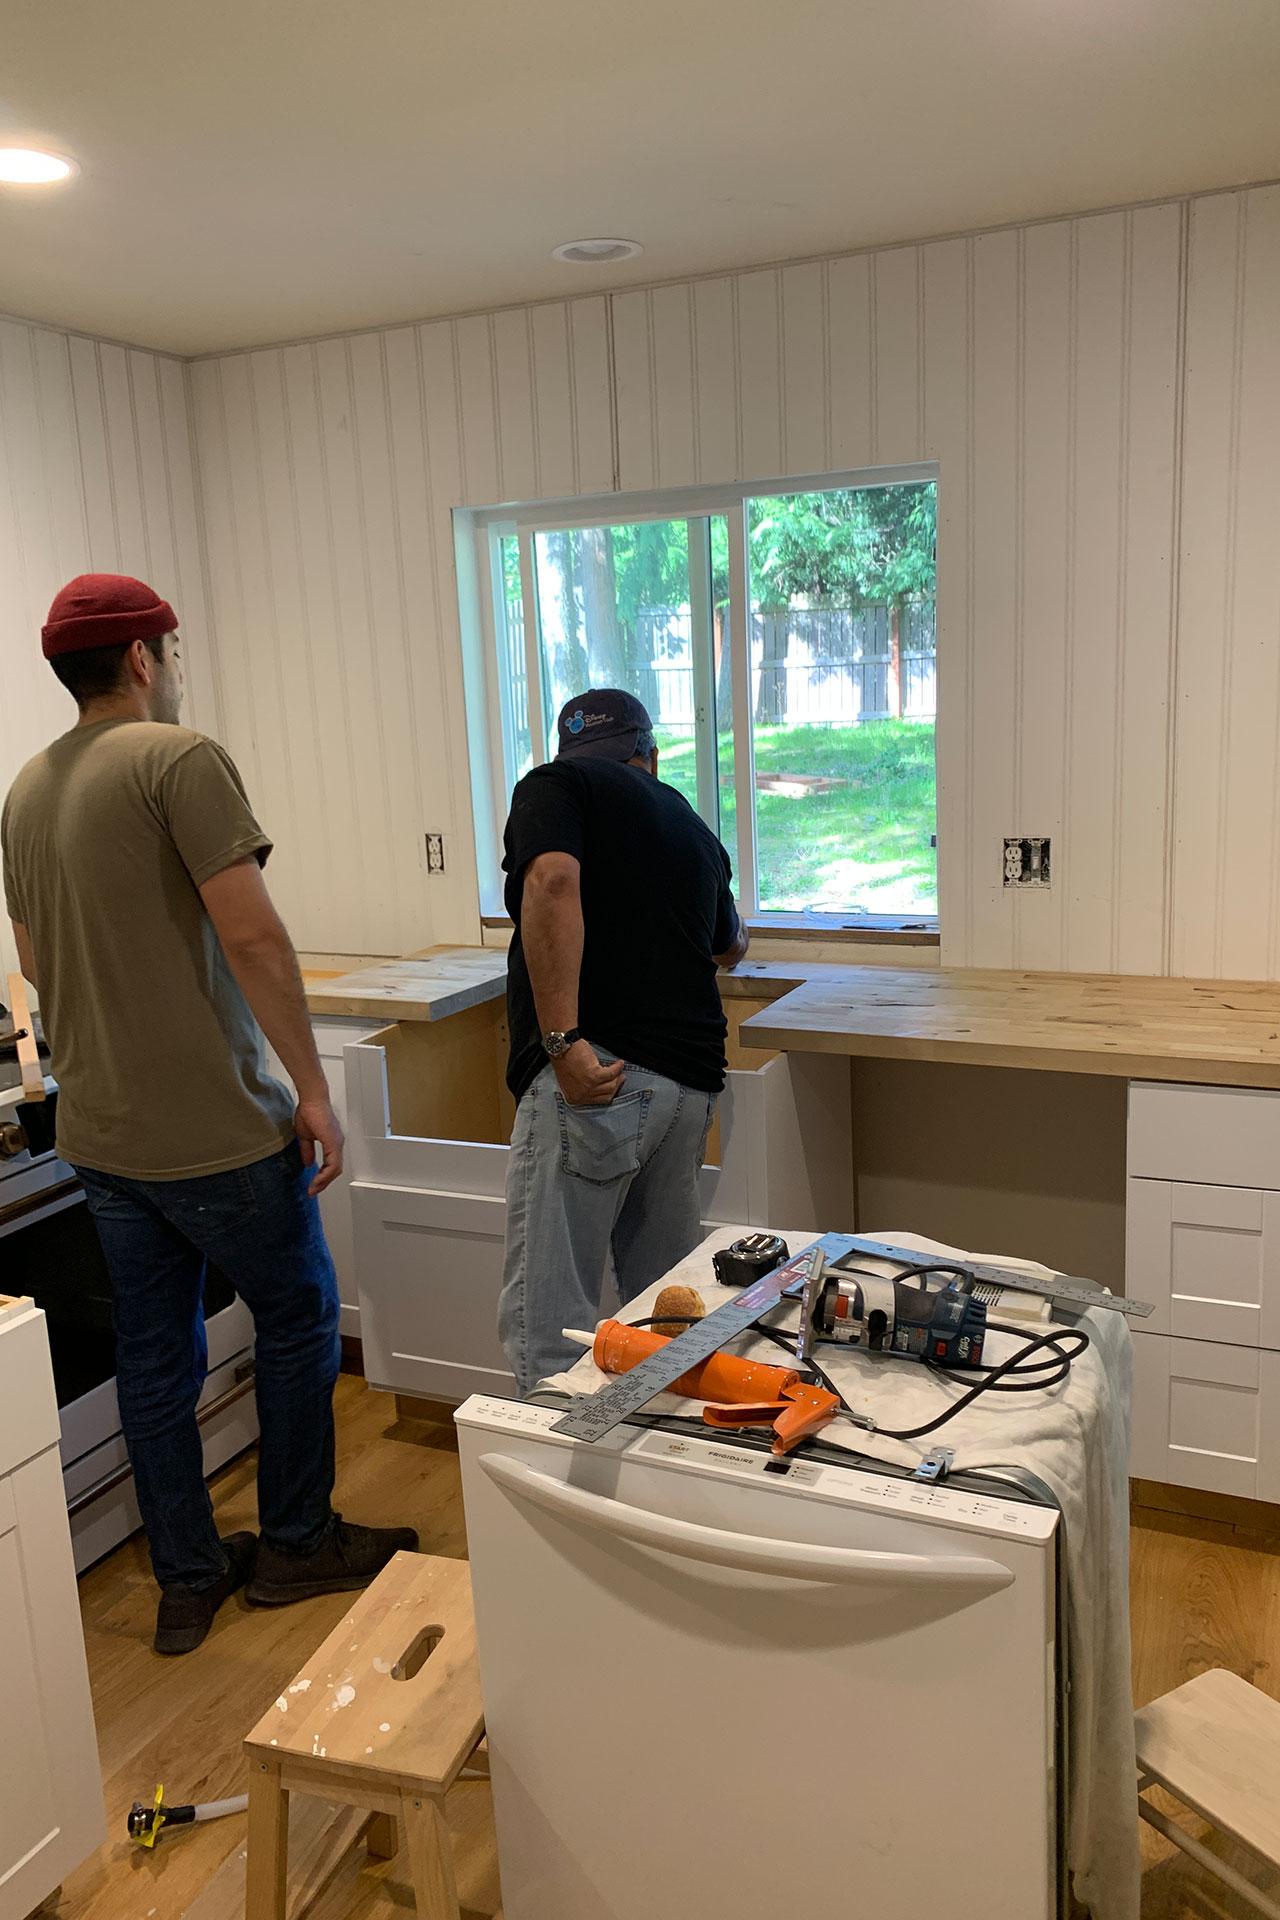
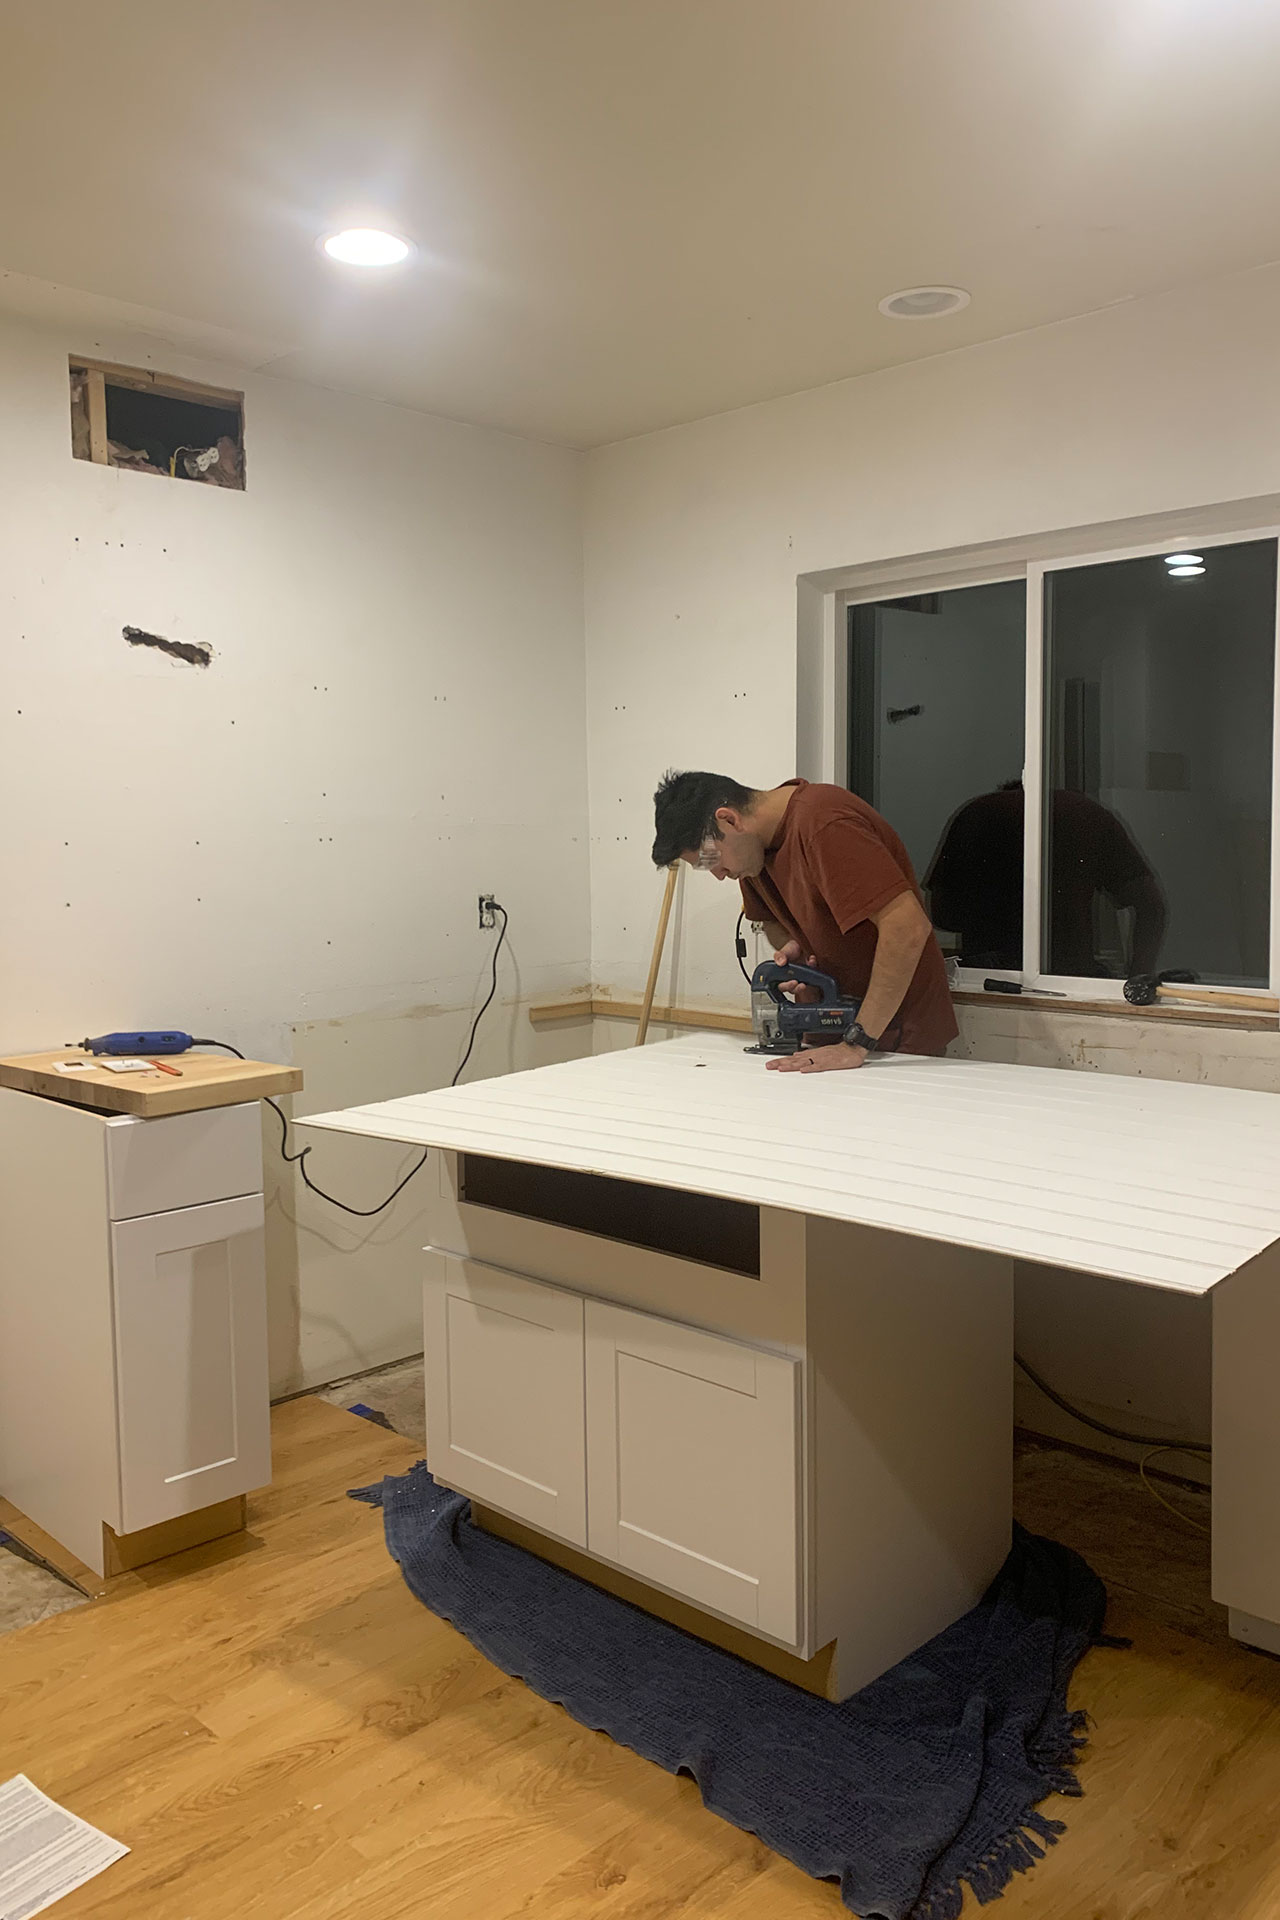
We ordered all of our cabinets from Home Depot, and had them delivered to the store, which cut delivery costs since we could pick them up ourselves as they arrived. DJ pulled off the countertops that we never sealed! (don’t do this, don’t be like us). If we had waited any longer we would’ve had to call our loss on them because of water damage. He sanded them down really good, until they were evenly soft like butter and most of the coloring was not water damaged. He then did two coats of the white wash stain, and after it dried, I think he did around five coats of water-based poly, we’d heard that oil based could yellow over time. He really loved the stuff! The difference was wild. From yellowed, grey/water damaged wood counters to smooth, easy to clean light and bright counters… literally made the most drastic difference!
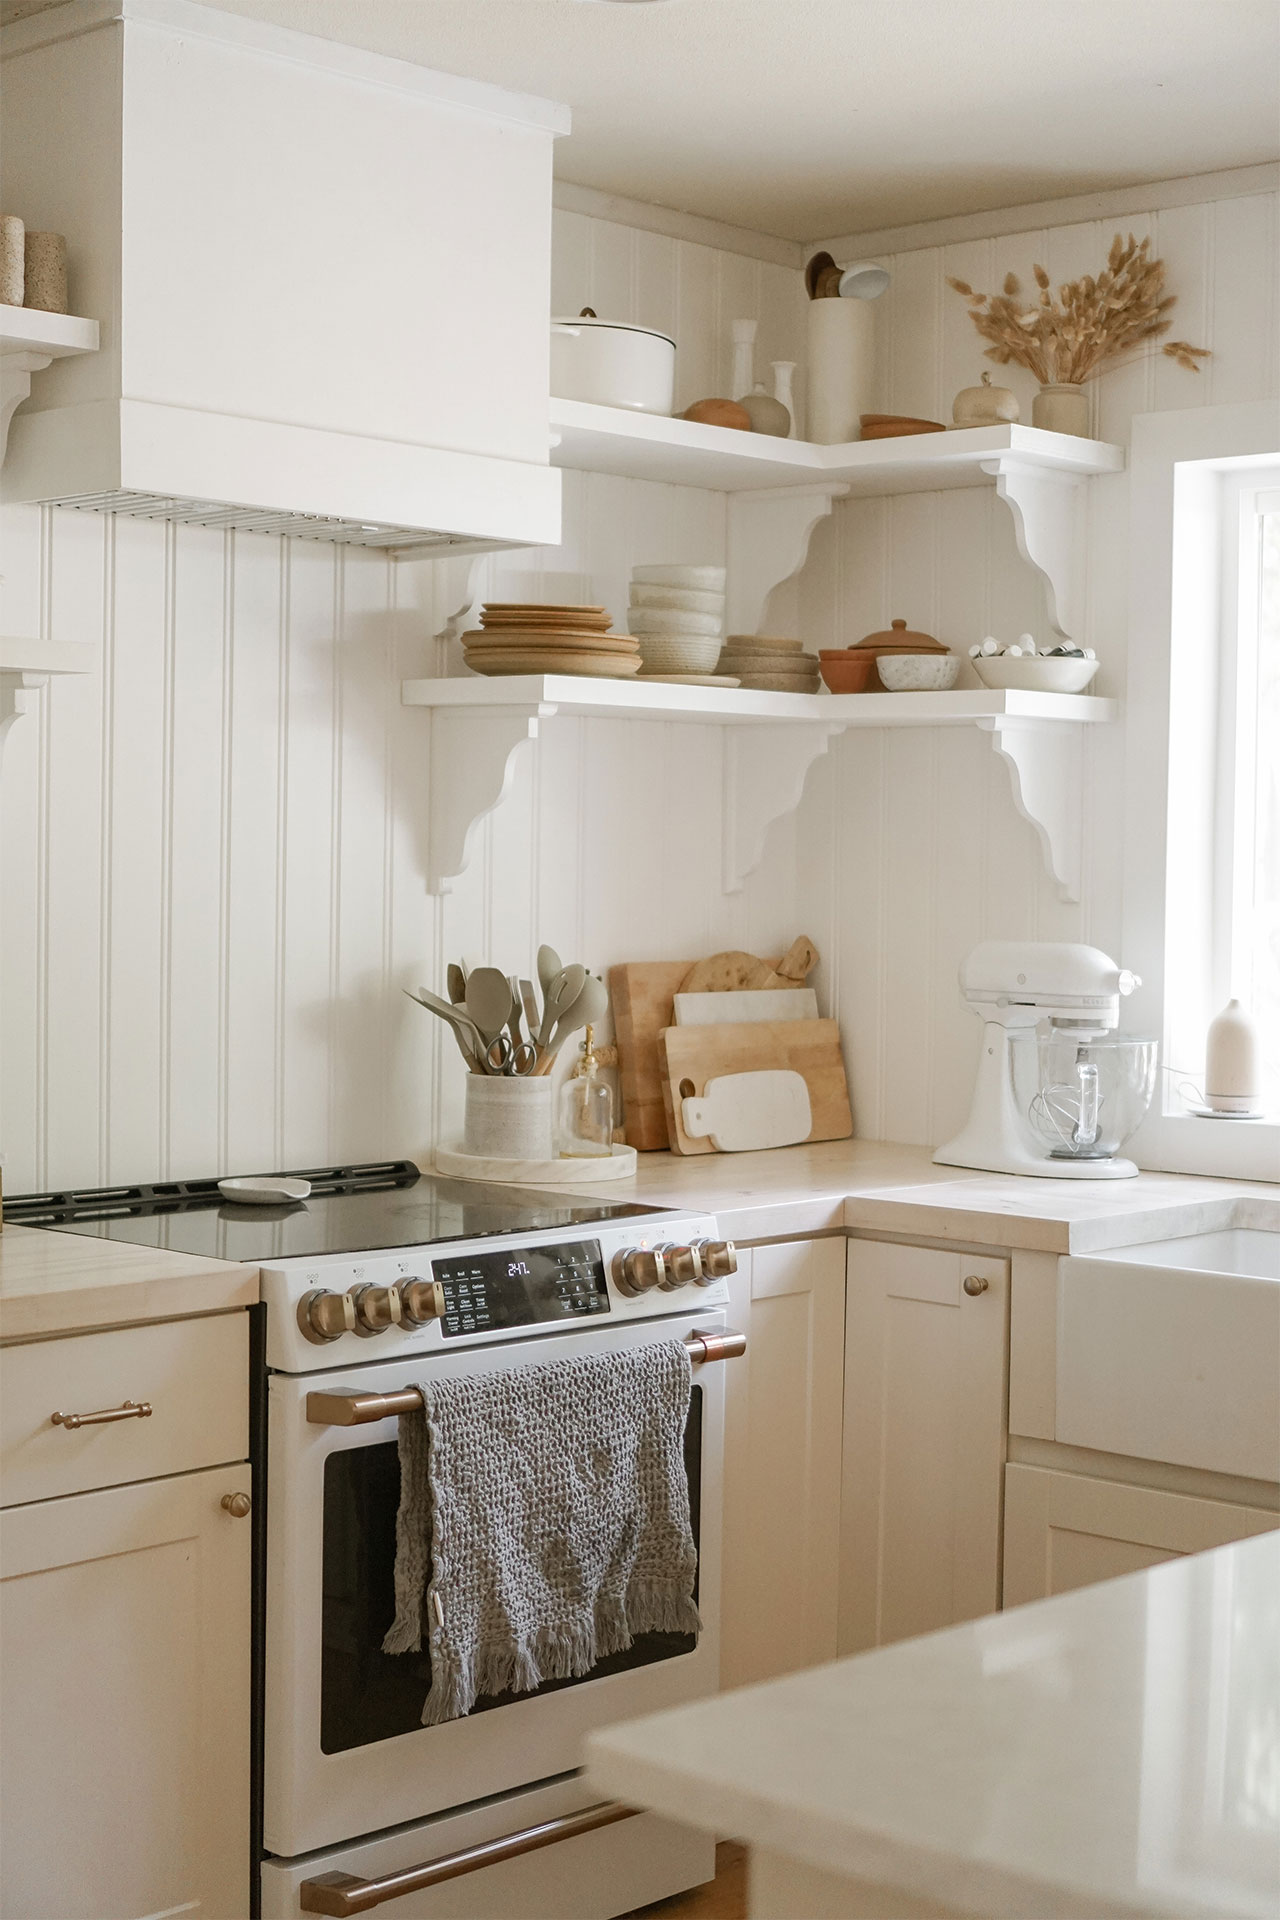
We chose to do a wide bead-board wall paneling for the backsplash over tile because it was more cost effective, I reallllly liked the look and character it gave and just truthfully so much easier to install than tile all the way up. The walls were pretty beat up and really ugly so it was an easy way to cover up the holes and yuck from previous owners that paint didn’t fix, on top of all the other things. My husband cut the sheets according to size (from counter to ceiling) and attached to wall with caulking and then nail gunned to the studs.
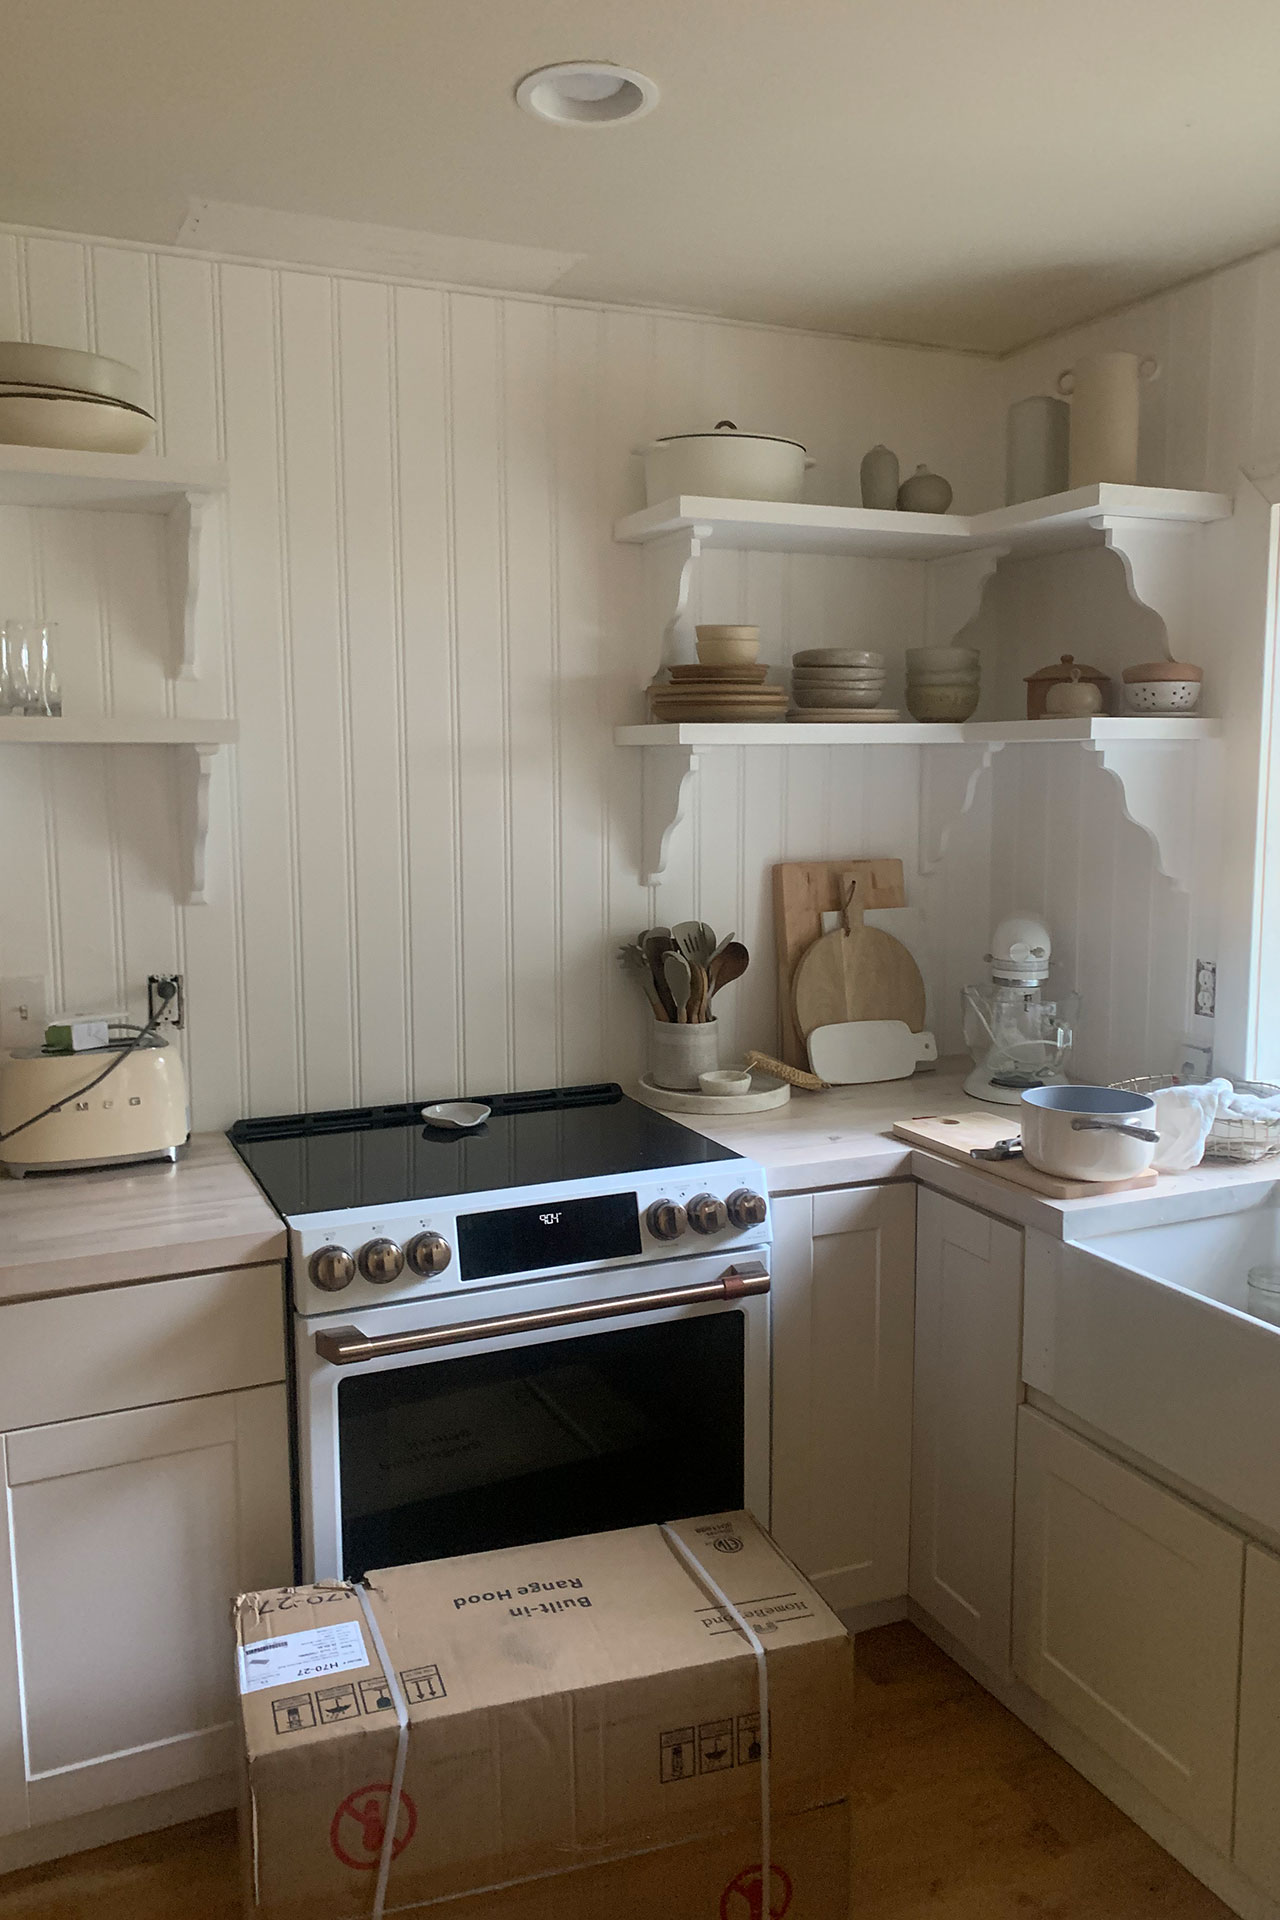
I also painted all of our open shelving white to match the walls, because the kitchen does not get very good natural light. I always take photos when it’s really bright in there, and then in post process editing can make it seem even brighter, but adding the white shelving and moving them upward made a large impact in the overall brightness of the room. I was so worried I’d regret painting the maple shelves, but I actually haven’t, not even a little bit! We originally used the cheapest metal brackets we could get, at I think Home Depot, and we replaced them with the wood brackets that I also painted white. Again, so thrilled with the outcome, and they feel so much sturdier as well.
We arranged and installed the new cabinets and took off the fronts so I could start painting them. I found out about Clare Paint and was immediately in love with their brand. They create zero voc paint that can be used indoors, without all the nasty fumes traditional paint leaves us with. I had gotten their really rad paint samples (they’re large vinyl stickers so you can get a true idea of the color without all the mess paint samples can be). I had planned on using turbinado for our cabinets, however we didn’t love how it paired with the new color of the butcher block counters after we white washed them. The tones kind of clashed and just didn’t look right. I was bummed but thankfully ordered a couple other beige colors I’d planned on using for other projects. I ended up using no filter for our lower kitchen cabinets, and they turned out SO lovely. I’m really happy with them! We used the trim/semi-gloss finish for the cabinets and also the doors downstairs. I’m a huge fan of eggshell or flat finishes typically, but with such a high traffic spot, especially with sticky little fingers and where spills happen so often… it’s just a whole lot easier to clean.
Clare supplied the brushes and rollers and trays for painting which made it all super easy for us, since it all arrived right on our porch. I’m really happy with the coverage the paint gives us, and so far, it’s all held up really well! I highly recommend Clare Paint for all your painting needs. I just really love their brand and products and look forward to projects in the future using their paint!
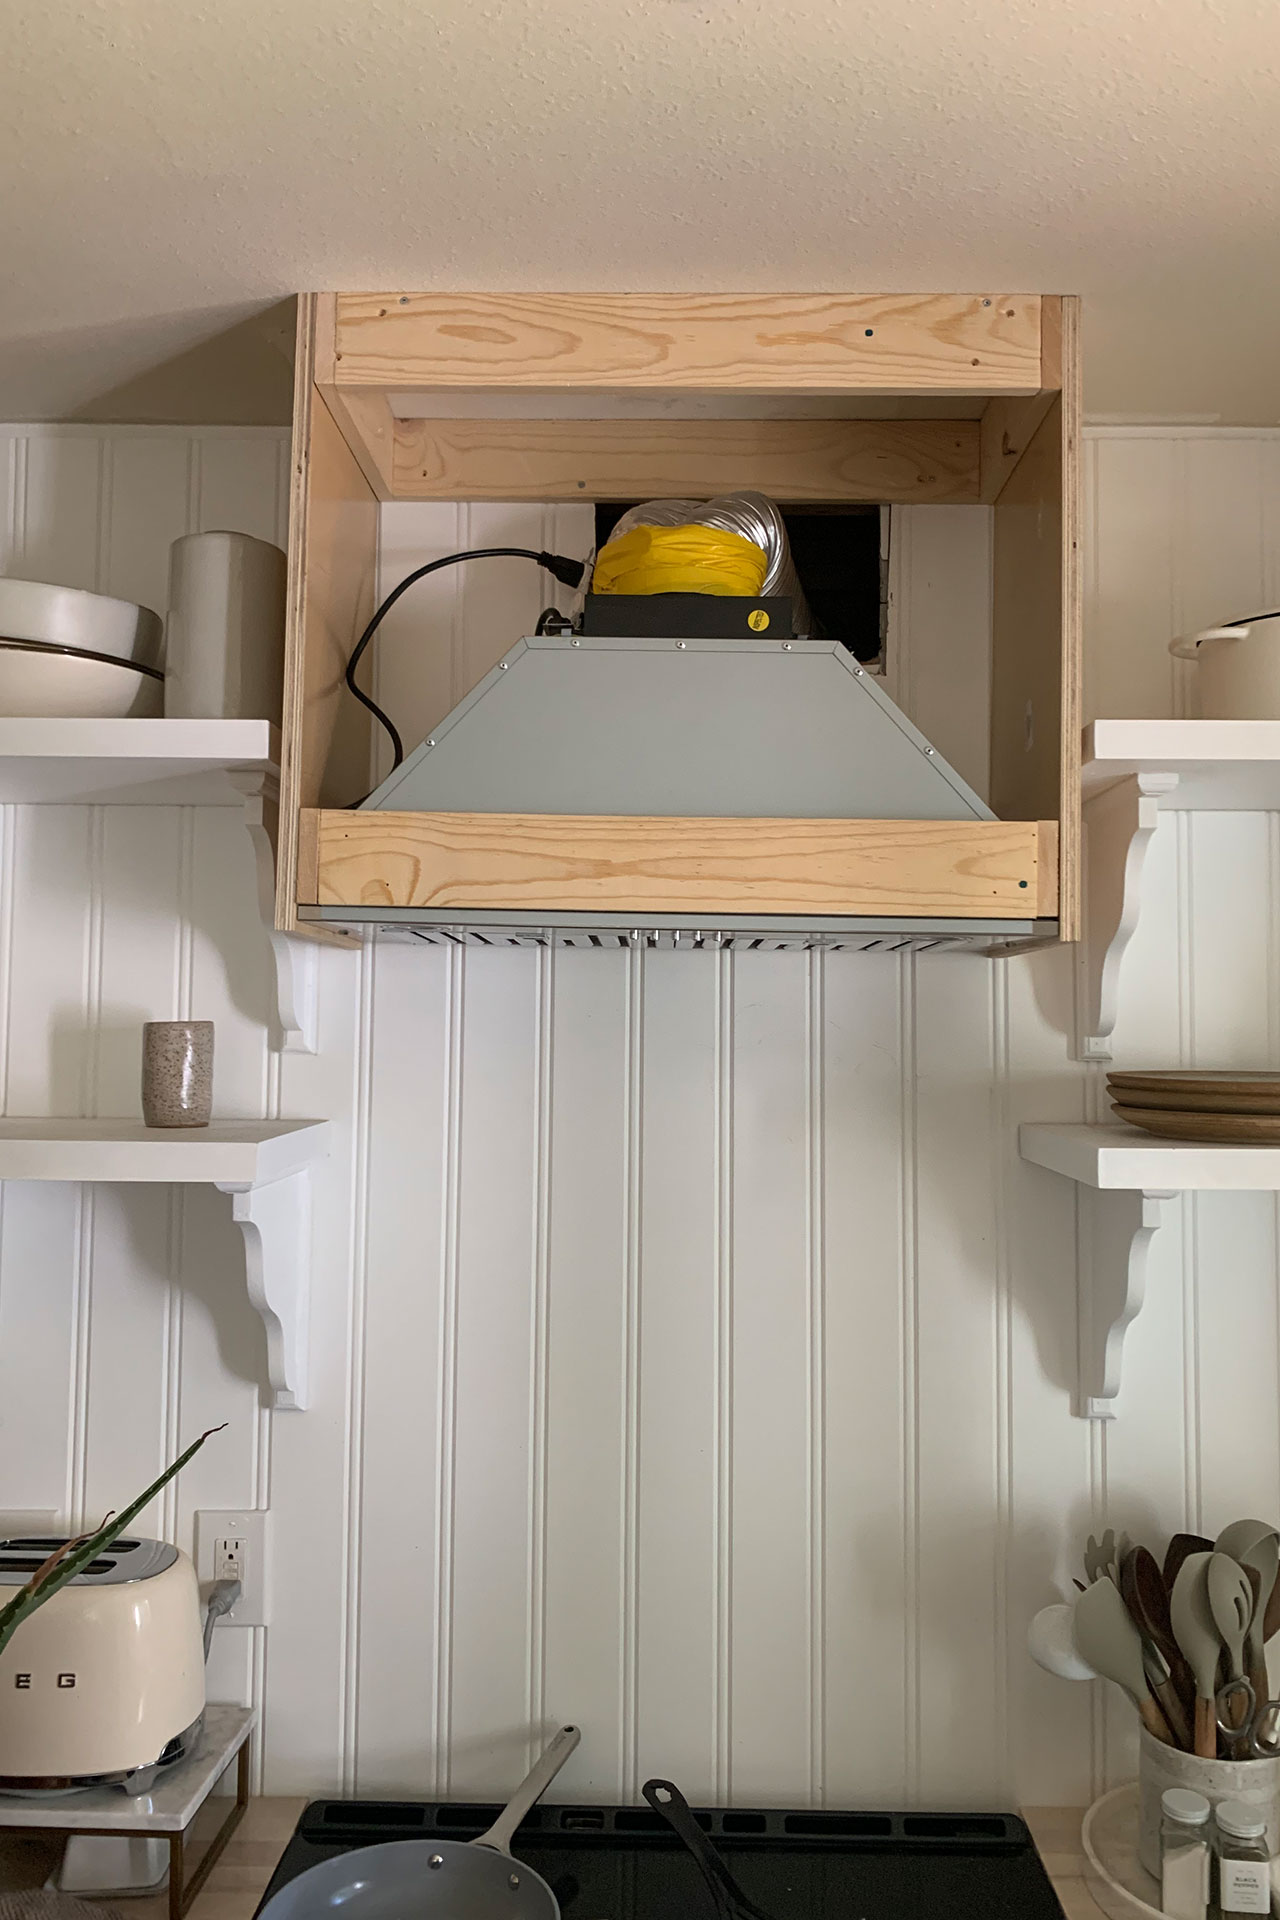
One thing we upgraded during the big reno was the vent hood. The original white one we’d purchased during the first set of updates was AWFUL. It was insanely loud and didn’t work as a vent at all. Such a sad waste of money… we would’ve been better off without one honestly. It was just that bad. We decided to get an internally installed vent that had really good reviews and DJ just made a box to cover it himself. He used 2×4’s and plywood sheets we already had to make it, then added trim later on that we also already had. So it was an awesome low-cost update that we are so pleased with! The vent itself IS SO MUCH BETTER. Something I never thought I’d care about, haha but truly the difference is amazing.
Lastly, we upgraded our range and fridge and guys… I about cried. We are still SO HAPPY with our appliances. It’s such a massive investment… we’d never bought appliances in our life before buying our house and gosh, we definitely went big! We went with the GE cafe appliances and have no regrets. They have got some wild bells and whistles. Our range is not gas like you typically see in renovated or new homes. We live in the forest and in order to get a gas line, which we don’t currently have, we’d need to do quite a bit of yard deconstruction and install a tank which would need filled with propane every so often. We instead chose the induction stove, which uses magnets, and convection oven, which uses fans to circulate the heat for a more even bake. There’s an app you can connect to and preheat your oven. Our fridge is the model with a water/ice dispenser, and we’re absolutely happy we didn’t skip it. I like the cleaner look of the fridge without it better, but we use it nonstop every day. Our girls are old enough to fill their own water cups, the crushed ice is really good (if you know, you know) and get this – it makes hot water! It also tells ya how many ounces you’ve gotten and the list goes on. We really like the drawer freezer and French doors… truly have no complaints. We’re very happy with our purchases! This isn’t sponsored by GE cafe appliances, but I wanted to share my honest opinion within this blog so it was all in one place 😊. We’ve had these appliances for well over a year now and truly are so happy.
Overall, we are just really thrilled with our hard work, from beginning to end. We definitely went the more difficult route since we didn’t just do it all from the beginning, before moving in or by a contractor; however, we have learned so much and although we’re going slow and steady, we’re doing it!
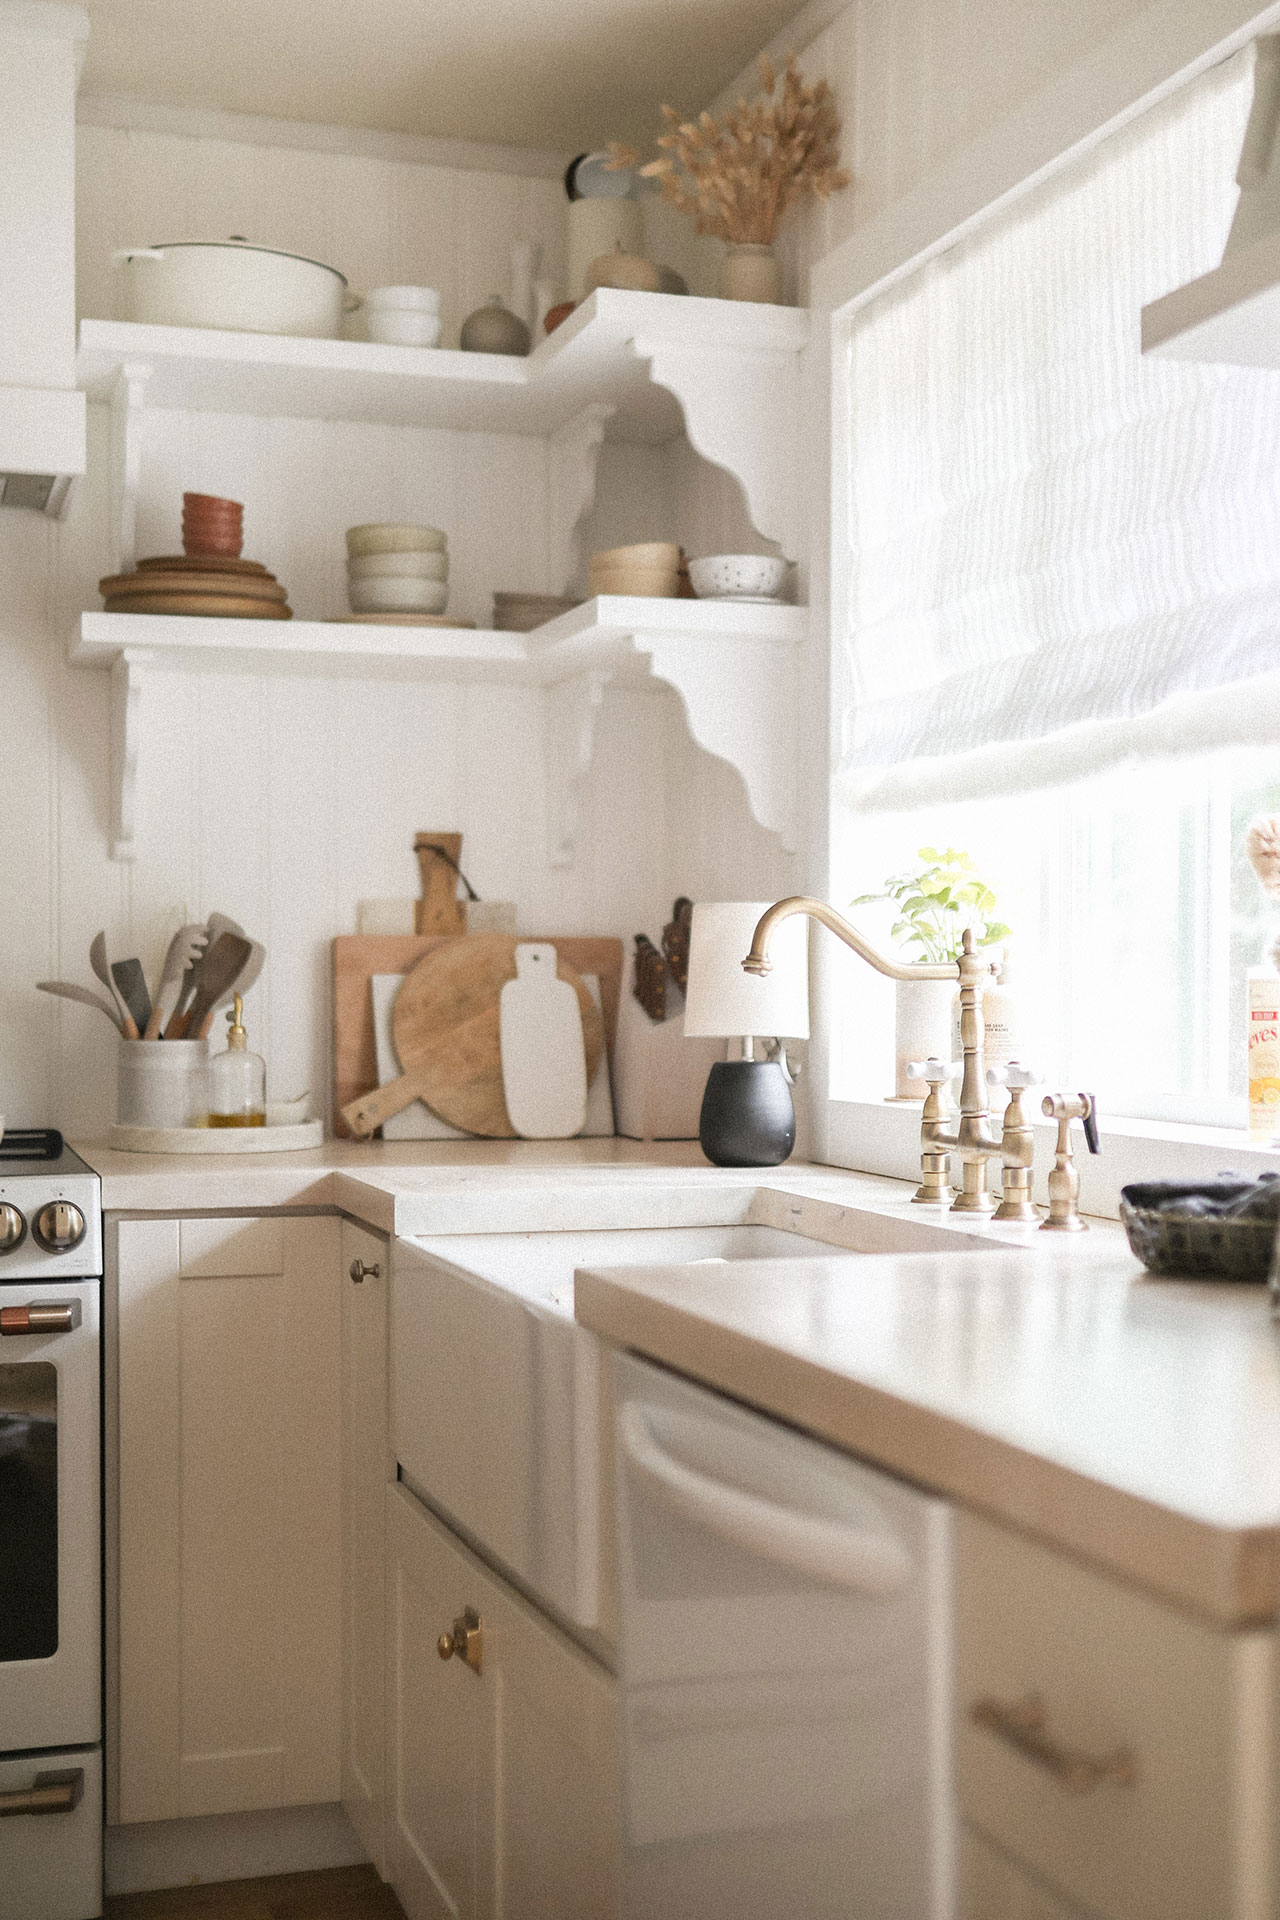
We have tried traditional curtains in this window a while back, and they just weren’t very practical. I recently partnered with wovn home to fit this kitchen window with inset custom roman shades, and oh my gosh; I now want them for every window in the house! The linen is beautiful. They have many different custom options for any style. We have their blackout shades in our girls’ bedroom, just another finishing touch that really makes the space even more cozy and functional. I love being able to close the shades at night for privacy, and they just make the space extra cozy and homey during the day. I love them! Be sure to check out their instagram for more inspiration and their website for all the information and pricing and how the process works. We are so happy with our choices and will absolutely be adding more of their products to our home in the future.